Spider Cake
While planning our little Halloween shindig, one of my first food ideas was to make a spider-shaped cake.
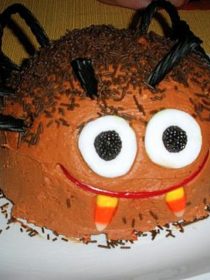
He’s made from a dome-shaped cake a’la the famous Barbie skirt cake, which I thought would also work out to be the perfect shape for our little buddy. The idea for Barbie cakes is this: Bake your cake in an oven-safe bowl, plop it out inverted, frost it, and stick Barbie in feet first so that it looks like her billowy dress. Hoo boy. I’m actually kind of surprised I didn’t beg and plead for this one when I was a kid.

I baked a test cake first, in an oven-proof bowl from Crate and Barrel. I used a boxed cake mix, and yay, it baked up fine – after about 60 minutes in the oven.
So as the party neared, I decided to bake the real deal. But the spider’s innards could be no ordinary cake. What would be better than cutting into the spider only to reveal bright red innards, a’la the famous Steel Magnolias armadillo cake? Enter: My first ever attempt at Red Velvet Cake – baked in a bowl!
Unfortunately, this one took about an hour and a half to bake all the way through. So the outside was nice and crisp by the time the inside was cooked. I figured I was SOL (Spider Out of Luck). Note lack of photographs from here until the surprisingly decently happy ending.
The next morning, with barely a glimmer of hope, I hacked off the burned outer layer and, because I was actually left with a reasonable amount of still-dome shaped cake, I decided to give it a whirl. I made yummy chocolate cream cheese frosting (see recipe at bottom), and frosted that dome to within an inch of its life (and actually probably about an inch thick). It worked!


So here’s the deal. I’m just going to give you a few spider cake instructions, and a frosting recipe, and I’m sorry, but I don’t have very many photos. But I promise, this really is super easy once you figure out the dome cake. Make the dome cake in a well-greased oven safe bowl (I hear Pampered Chef batter bowls are perfect), frost it, put on the candy face and some licorice legs! Boom, fresh spider!
Spider Cake
Ingredients
Instructions
And here’s the chocolate cream cheese frosting. It’s really really easy, and really really good. Really.
Chocolate Cream Cheese Frosting
Adapted from Food Network’s Cream Cheese Frosting recipe
Ingredients:
- 1 pound cream cheese, at room temperature
- 4 cups powdered sugar, sifted
- 1/2 cup cocoa (I used Scharffen Berger for this one)
- 2 sticks (1 cup) unsalted butter, softened
- 4 cups of powdered sugar, sifted
- 1 teaspoon vanilla extract
Instructions:
- Beat the cream cheese, powdered sugar, cocoa, and butter on low until it all comes together, then beat on high until light and fluffy – about five minutes.
- Add the vanilla, then beat again until it’s fluffy.
- If necessary, you can chill this to make it thicker.