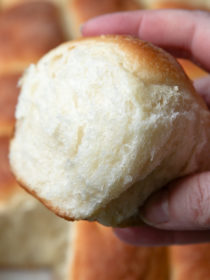
Dairy-Free Dinner Rolls
Please the vegans and dairy-free eaters without disappointing the carnivores. These soft, fluffy, buttery, and melt-in-your-mouth dinner rolls are total crowd-pleasers - no eggs or dairy needed.
Ingredients
- 6 tablespoons + 2 tablespoons vegan butter divided; I use Earth Balance
- 2 cups unsweetened soy milk
- 1/2 cup water
- 2 1/4 teaspoons active dry yeast one packet) (not instant
- 1/3 cup granulated sugar
- 1 1/2 teaspoons salt
- 5-6 cups all-purpose flour
- 2-3 teaspoons canola oil for greasing the pans only - not for the dough!
Equipment
- Stand mixer
Instructions
Make the Dough
- Add 6 tablespoons of Earth Balance to a small sauce pan. Set on your stovetop over very low heat, until melted. Add the soy milk and water. Continue heating until the temperature hits about 115 degrees (it will cool off a bit when you add it to the bowl of your stand mixer).
- Pour warmed butter and milk mixture into the bowl of your stand mixer. Add the sugar and stir to combine.
- Check the liquid with the thermometer again to make sure the temperature of the liquid is between 100-110 degrees. Most say this feels warm but doesn't sting your hand to the touch. For me, the only way to really tell is to use a thermometer. You can use a meat thermometer or a candy thermometer. The reason temperature is so important is that if the temperature is too low, the yeast won't activate. If it's too warm, it will kill the yeast.
- Once the liquid is between 100 and 110 degrees Fahrenheit, add the yeast and stir to combine. Let sit 5 minutes, until bubbly, then stir in the salt.
- With the dough hook on the stand mixer and the mixer on low speed, add the flour, 1 cup at a time, until the dough starts to look shaggy when the flour is added but is still relatively loose and wet. When you have the right amount of flour, the dough will cling to the hook for a moment and then begin to fall back into the bowl. Once you're there, resist adding more flour! It usually takes about 5 1/2 cups for me, but it can really depend on if you ended up adding a bit more or less liquid.
- Increase the speed to medium and knead 4-5 minutes until the dough is smooth and elastic. It will be soft and relatively sticky but you should be able to handle it without getting too much on your hands.
Let the Dough Rise
- Rub a little neutral oil (I use canola) in a large bowl and transfer dough to the bowl. A bit will probably stick to your hands but that's okay! Let rise until doubled in size, 30 minutes to 1 hour.
- Punch down the dough. Prepare a surface by sprinkling a tablespoon or two of flour on it. Turn the dough out onto the surface. It might still be a little sticky but soft and smooth to the touch.
Cut the Dough into Rolls
- Using a bench scraper or large knife, cut dough into quarters and then cut each quarter into 5 pieces roughly the same size. Don't worry if they're not exactly equal.
- Grease a large rimmed baking pan, approximately 9" x 13". I like to rub my pan with a teaspoon or so of canola oil. Take each piece of dough, fold the four corners onto the bottom to form a round shape, and place in greased pan. You should have 20 rolls or 5 rows of 4 rolls each.
Now for the Second Rise
- Cover with plastic wrap. Let the rolls rise until almost doubled, about 20 minutes. Meanwhile, preheat oven to 375 degrees Fahrenheit.
Brush with Butter and Bake
- Set remaining 2 tablespoons of vegan butter into a small saucepan over low heat to melt. Remove plastic wrap from risen rolls and brush the tops gently with the melted vegan butter.
- Bake until golden and a thermometer inserted into the center of the rolls registers at about 195 degrees Fahrenheit, 25 to 35 minutes. Remove from oven and set on a cooling rack until cool to the touch. Enjoy immediately or serve later.
Video
Notes
Rolls keep at room temperature for about 5 days (I like to keep them in a sealed zipper bag). They also freeze well.
Tips for Success
- Make sure your yeast has not expired - it should be one year old max.
- Liquids should be between 100 - 110 degrees Fahrenheit before stirring in the yeast. I use a thermometer.
- Feed it sugar. When proofing the yeast, add sugar, but hold the salt. Yeast feeds on sugar but salt can stifle it.
- Your yeast should be bubbly after about 5 minute
- Once about 3/4 of the dough is balling up on the beater but the rest is sticking to the bottom immediately after adding the flour, stop adding flour. The dough will still be a bit sticky. That's good.
- If your yeast doesn't bubble or your dough (for this particular recipe) doesn't double in size within 60 minutes, it's probably not worth your time to continue with the recipe. I've found whenever I power through with a failed proofing or dough, I'm better off tossing it and start over.
Nutrition Facts
Serving: 1roll, Calories: 175kcal, Carbohydrates: 28g, Protein: 4g, Fat: 5g, Saturated Fat: 1g, Sodium: 221mg, Potassium: 75mg, Fiber: 1g, Sugar: 4g, Vitamin A: 264IU, Calcium: 35mg, Iron: 2mg