This is a departure from my usual food posts, but you know I had to share this fun little upcycle project that my guy and I tackled this month – a play kitchen that we made from an old entertainment center.

If you’ve read anything from my blog before, you probably know I am the proud mama of a young, busy toddler. My gal is nearly two years old, and I’ve been wanting to help her get her mitts on a play kitchen, well, pretty much from the time she started walking.
Fueled by Pinterest, a discarded entertainment center, and the grandiose notion that we have more talent – and time – than we actually had, we decided that Santa was going deliver an upcycled play kitchen this Christmas.
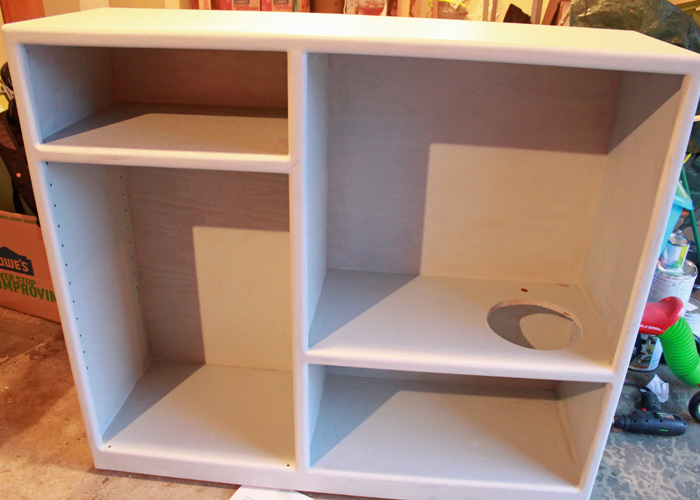
We started out with this behemoth. Actually, there were some lovely smoked glass doors on the left, but by the time I took this “before” photo, they were long gone.

We sanded it and we painted it and, with a jigsaw, cut a hole where the sink was going to be. We bought a piece of plywood for the back (Lowe’s cut it for us for free), and also cut to size a wooden refrigerator “door.” My husband used a router to round the edges of the fridge door, and to bevel the edges of the oven window (which, by the way, is simply a $3 piece of 8″ x 10″ plexiglass).

This one lonely photo is all I have for “in progress” shots. Things were entering panic mode right around this time – I think I took this photo on December 23. And at midnight on Christmas eve, we were still working on it. Did I mention we have a tendency to bite off more than we can chew?!
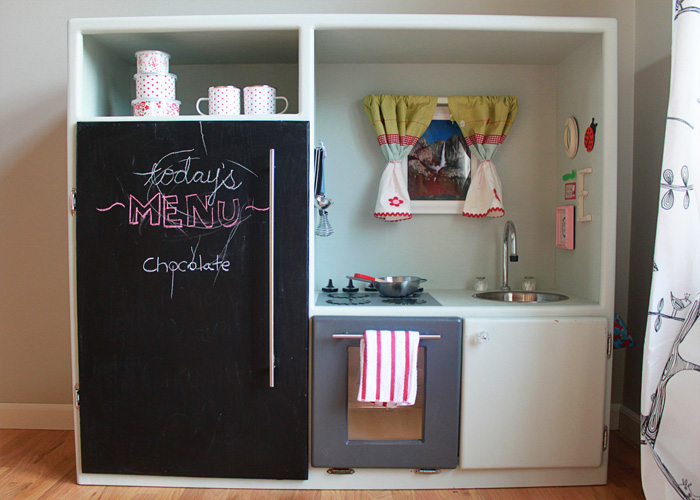
Anyway, here is the finished product.

Yay! We finished it by the skin of our teeth.
I’ll throw a few details out there, just in case you’re thinking of tackling one of these on your own:
- This will take you much more time than you think it will.
- Even if you’re being super diligent about keeping your costs low, it will probably cost you nearly as much as a store-bought play kitchen.
- If you have the romantic notion that this will be a fun little project to work on with your spouse and it will be all fun and sweet hanging out in the garage applying paint and laughing gaily, well … good luck with that. 😉 If you’re anything like us, one of you will probably end up doing about 90% of the work. The other one may or may not cry at some point over the whole endeavor. You probably don’t need more than one guess to know who’s who (my guy did an incredible job building this thing).
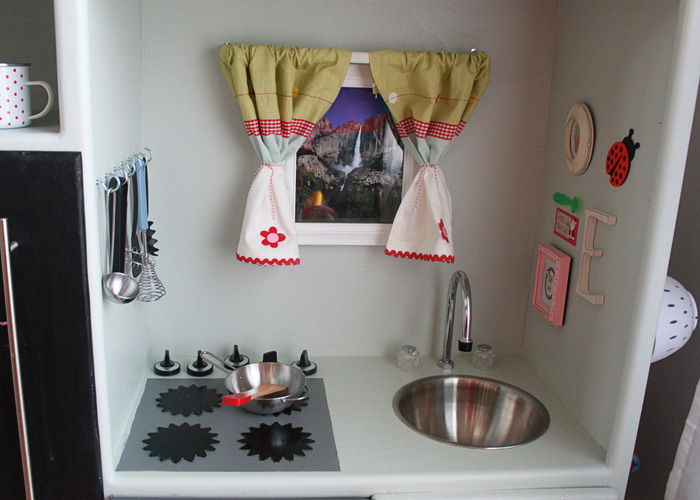
- The “window” is an 8″ x 10″ picture frame with a photo of Yosemite compliments of Costco’s Art & Image Gallery. Our daughter has been obsessing a bit over waterfalls ever since we went to see one near here. And it was one of the first things she noticed!
- The curtains are an old scrap of Ikea material. I was going to make them out of red and white gingham until I came across this piece in my fabric bin. They’re about 18″ long and about two feet wide. They were a little too wide, but a little emergency baker’s twine tied them up nicely.
- The color is Benjamin Moore Herb Bouquet 460 (I found it in the mismatched paint section of a local hardware store). Gotta say, I expected the color to be much darker/deeper, and I’m a little disappointed that it ended up so light. But the price was right, and Miss Thing doesn’t seem to mind.
- Chalkboard paint, on the inside and the outside of the fridge door. Totally worth the tiny extra bit of effort. She loves it.
- I wanted to paint a faux “countertop” to make it more realistic, and even paint the back kitchen “wall” a different color, but, yeah. No time.
- We got the stove knobs and the faucet knobs at local hardware stores, making sure there weren’t any choking-hazard-size pieces that could come off. My guy screwed them on in a way that allows them to still turn. I … wish I could be more descriptive but if you’re reading this and have a question about that, leave a comment and he’ll chime in.
- The faucet is a $3.50 thrift store find. New faucets are expensive! I had no idea.
- The sink is a $5 metal bowl from TJ Maxx. Metal dog bowls work great too.
- The stove top is simply a painted gray square. The “burners” are little wood sunshines that we picked up at Michael’s craft store, spray-painted glossy black and glued on.
- The oven? Well, it still needs some work. The door is a little heavy and could fall on her foot. Our temporary fix was to add a chain so it doesn’t drop all the way to the floor. Unfortunately, she also likes to sit and stand on the oven door, and not even 24 hours later, one of the hinges is bent, and the other one has already had to be replaced. We are thinking of finding some different hinges or just moving the hinges back to the left so it can just swing open to the side. Not as realistic, but safer.
- The oven “rack” is a wire cooling rack straight from my cupboard of kitchen supplies. I’ve been wanting some new ones, so that worked out perfectly! The rack makes a satisfying metal “clang” when she bakes her “pizza.”
- The oven light is just a battery-powered push light. I love how she can see things “baking” through the oven window.
- We need to add a light above the sink and oven area. Maybe a cute little chandelier. It can be a little dark.
- Ikea sells great little play metal pots and pans and utensils. Daiso is where I got the metal mugs and bowls you can see above the fridge.
- I screwed up the spacing of the stuff on the gallery wall on the right. It was 1 a.m. Christmas morning and we were exhausted. It pains me every time I look at it. There’s also a streak of Gorilla Glue under the ladybug that you can see if you look closely. Ugh. Give yourself ample time!
Our little gal loves her new kitchen. She calls it her “house.”
And us? Well … we are THRILLED to be done. And, yeah – pretty proud of ourselves, too. And more than a little surprised that Santa actually finished it on time and was able to deliver.
Let the air coffee sipping and wooden pizza nibbling begin!


 I’m so glad you’re here! I’m a vegetarian home cook, certified plant-based pro, and mom. I’m married to an enthusiastic carnivore, and my mission is to achieve peace in the kitchen – one tasty recipe at a time. These days, with a name like mine, I also try not to ask to speak to the manager.
This is the cutest thing ever!! I would have loved to have this as a child.
This is incredible! I cannot believe you made it yourself, I never would have the creativity nor the patience to do that. I am sure she will cherish it for a long time!
Adorable, you 2 should be so proud !!!
This is absolutely adorable and so creative. I’m sure that cutie pie Miss Thing will love cooking there!
We’re hoping to make one of these this summer, you did a great job!
Thanks, Stephanie! As relieved as I was to complete the project, I must admit I’m going through a little bit of a mourning period now that the planning and dreaming and scheming is behind us. She’s been having a blast with her new kitchen, though!
Ha, this sounds just like my experience making my sons play kitchen for Christmas. It too was way more work than anticipated, and I think ended up being more expensive than the one I had been thinking of online. And we were finishing it at 2 am on Christmas morning. Actually its still not finished, we had to put temporary knobs on until the real burner knobs came in the mail. I would like to know how you attached them so they still spin?
Great job on the kitchen, I love the little gallery on the wall!
Hey! I’m about to begin my own play kitchen project and I was wondering how you attached the pleco glass to the oven door. I’m not sure I wanna even attempt that!!
My husband carefully drilled holes into the plexi-glass then used small screws to affix it to the wood. Hope that helps – good luck on the project!
How did you get the stove knobs to still spin? I have been searching and racking my brain about how to do it.
Hi there, I am about to start on my own play kitchen project for my son’s 2nd birthday present. I’d love to know more about how your husband attached the stove knobs so that they turned. I am hoping to do the same thing with mine. Thanks!
Oh my goodness- I love the little curtains on the window! This is so, so cute! I bet she loves it!
This is incredible! I cannot believe you made it yourself, I never would have the creativity nor the patience to do that. I am sure she will cherish it for a long time!
Cheers!
Thank you Debra! 🙂
Nice blog. Toy kitchen is all time favorite play for my kids. I am searching best toy kitchen for my baby girls. Thanks for sharing really helpful guide.
Amazing! Toy kitchen is most favorite play in childhood. In my childhood, I had spent most of the time with my toy kitchen. My 2 years girls also like it so much. I think this kind of pretend play kitchen also helpful for child mental growth. So I want to buy the best toy kitchen play for my baby. Thank for sharing the best play kitchen to choose the right one for my kids.
Excellent read. Fueled by the same countless Pinterest posts, I have been wanting to do this myself. One problem though, I can’t seem to find any useable old entertainment center here in the Netherlands. Are these entertainment centers from a specific American brand?
I have seen so many examples on Pinterest, but I just can’t find anything like that with those dimensions over here.
Oh interesting! Entertainment centers are pretty ubiquitous over here and were made by all sort of manufacturers, or at least they used to be in the days before flat-screens took over. I’ve seen people make play kitchens out of nightstands too – maybe something like that would work? Good luck!
Your kitchen turned out beautiful. I am currently working on the same thing for my daughter. The one thing I’m struggling with is the knobs on the stove. How did y’all install them to where they still turn? I have been racking my brain over this for three days. Thank you,
Jennie d
Hi Jennie, we grappled with that one too! My husband added the screw through the top piece so that it still turns, then glued the entire knob on with Gorilla glue.
Amazing collection! Pretend play kitchen helps kids mental growth. Its essential for kids skill development. Kids can learn many things through play. I am searching best play kitchen for my kids. Thanks for such a helpful guideline sharing with us.
Awesome post. I love the little curtains on the window. It’s so cute! I bet she loves it! I want to make it for my daughter. Thanks for sharing.
Hey Kare. This is amazing. Absolutely love this. I’ll surely try this cutie pie creativity