
Ahhh … cold brew concentrate. The perfect iced coffee. Cold brew coffee is deep, rich, cool, and creamy. Even a little … chocolaty? There’s just nothing else like it. And the best part is that it’s SUPER easy to make. Let’s make cold brew!

It’s easy (and inexpensive!) to make cold brew concentrate at home. So I thought I’d gather together everything I know about how to make cold brew coffee, and share with you here!
Table of Contents
- The Story Behind the Recipe
- All About Cold Brew Coffee
- Cold Brew Concentrate Ratio
- Cold Brew Coffee Ingredients
- How to Make Cold Brew Coffee Concentrate
- Ideas for Serving Cold Brew Coffee
- How to Store Cold Brew Concentrate
- More Coffee Shop Drinks
The Story Behind the Recipe
I’ve been making my cold brew iced coffee at home for years now, and through lots of trial and error, I think I’ve pretty much got it down.
After trying it several different ways, I settled upon this cold brew concentrate method. It’s basically a magical way to brew coffee into pure deep-roast goodness without any of that shiver-inducing, bitter acidity. Pure mild-tasting – but potent – goodness.
Readers say …
-Ellie
“Just had my first cup of condensed cold brewed coffee following this recipe, and WOW. Thank you so much for posting it, you just saved me a ton of money otherwise spent at Starbucks.”
All About Cold Brew Coffee
“Cold brew” really means room temperature, by the way. Basically, you’re not brewing hot coffee.
Why cold brew? First of all, it tastes SO much better than plain iced coffee, which is hot coffee that has been cooled down and then served over ice. The flavor of cold brew is:
- Deeper than plain iced coffee
- Richer
- Much less acidic
Basically, the cold brew method doesn’t pull out as many of the compounds in the coffee beans – just the rich, bold taste of the beans (source)
Cold brewing coffee results in a delicious, potent elixir which, if you’re not careful, could give you a seriously surprising caffeine jolt. Start slowly! I’m serious – the extreme jitters are no fun, and trust me – I’ve been there.
This concentrate is meant to be mixed with an equal amount of water and poured over a glass packed with ice.

Cold Brew Concentrate Ratio
The cold brew ratio for concentrate is so simple.
It’s simply 1 part ground coffee beans to 4 cups water. Done! The cold brew ratio for straight-up cold brew (not concentrate) is 1 part ground coffee beans to 8 cups water.


Cold Brew Coffee Ingredients
- Coffee beans – You want good beans for your cold brew! No weak blondes here. Go for a robust, medium to dark roast. My very favorite beans for iced coffee come from a local chain, Cafe Ladro (which you can actually find on Amazon! [affiliate link]) Their Ladro Blend is big and bold, but still uber-smooth and chocolaty. It makes the perfect cold-brewed iced coffee.
-and- - Water!
How to Make Cold Brew Coffee Concentrate
Step 1: Grind Your Beans at a Larger Grind
Take one cup of beans and grind them. Go for a medium-to-large grind – not too fine. Preferably, you can grind your beans at home for the freshest, most flavorful result – but if you need to have them ground at the store or coffee shop, you’ll still be in good shape.

Step 2: Just Add Water and Stir
Place the grounds in a 40-ounce or larger jar or pitcher with airtight lid (a 2-quart mason jar is perfect), and add 4 cups cool water. Preferably filtered, but if you don’t have it, no biggie.
And then stir! The grounds and water need to be good and stirred together to get the everything flowing.

Step 3: Let it Steep at Room Temperature
Put the lid on the jar or pitcher and sit it somewhere on your kitchen counter, out of direct sunlight. And let it sit overnight (at least 6 hours), or up to 12 hours.

Step 4: Strain
I’ve strained my iced coffee a gazillion ways, and I suppose every single one qualifies as a hack.
Here are a few ideas for how to strain cold brew coffee:
- Pour it into a French press and gently push down the plunger. Pour out the iced coffee concentrate.
- Place a coffee filter into a funnel and set the funnel over a bottle. Pour the concentrate into the funnel to strain out the grounds.
- Line a fine-mesh sieve with cheesecloth or, in a pinch, paper towels. Set it in a bowl and pour the concentrate over the sieve.
- Or, my current favorite method: use a nut milk bag (affiliate link). I’ve been using the same fine-mesh bag I use for making almond milk, and it’s the easiest method I’ve found, by a mile. Note: a reader mentioned that pantyhose works as a great stand-in for nut-milk bags. I can see how they would work perfectly, but … well, hey, it’s an option, right?!


Step 5: Drink!
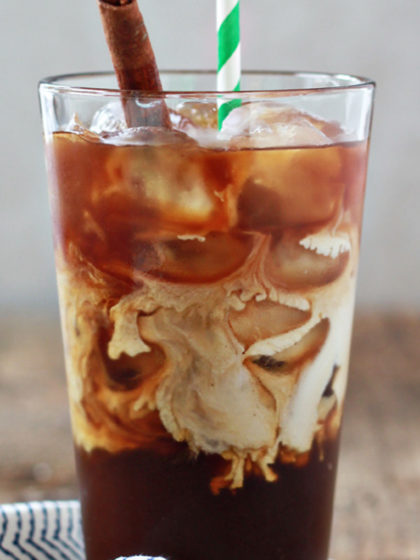
The best part! Pour 1/2 cup iced coffee concentrate and 1/2 cup water over a glass of ice or coffee ice cubes. Add cream and a little sweetener, if desired. Stir, plop in a straw, and enjoy the good (caffeinated) life.

I also really enjoy this cold-brew coffee straight-up, without water – it tastes incredible and has quite the jolt of caffeine, so I do have to take it easy.
Your cold-brew should keep in an airtight container or jar in the refrigerator for up to a week.
Ideas for Serving Cold Brew Coffee
Once you’ve enjoyed a few iced coffees, you might be in the mood to shake it up. Here are a few ideas for your cold-brewed iced coffee concentrate including DIY coffee syrups to spice it up and more:
- Cinnamon Dolce Iced Coffee
- Orange Spiced Iced Coffee
- Vanilla Iced Coffee
- Maple Vanilla Iced Coffee
- Pumpkin Spice Iced Coffee
- Drizzle a little of this Homemade Chocolate Syrup into a glass. So good!
- Try coffee ice cubes – no more watered-down coffee!
- And try my favorite non-dairy creamer alternatives: 3-ingredient coconut coffee creamer, DIY almond milk coffee creamer or DIY cashew milk coffee creamer.
- Or just head on over to this post about 10 different ways to upgrade your iced coffee for just about every level-up cold brew concentrate idea you can think of!
How to Store Cold Brew Concentrate
Keep cold brew coffee in an airtight container in the refrigerator for up to 7 days.
More Coffee Shop Drinks
- Easy Iced Matcha Latte
- Turmeric Latte
- Crock Pot Vanilla Latte
- London Fog Latte
- Cinnamon Dolce Iced Coffee
And here’s the actual recipe and handy-dandy print option if you’d like.

Cold-Brew Coffee Concentrate Recipe
Ingredients
- 1 cup coffee beans (coarsely ground)
- 4 cups room temperature water
Instructions
- Add the grounds and the water to a 40-ounce or larger jar or pitcher with airtight lid. Stir. Put the lid on and put the jar/pitcher somewhere out of the way on your kitchen counter, out of direct sunlight.
- Let it sit for at least 6 hours, up to 12.
- Line a fine-mesh sieve with a couple of layers of cheesecloth and set it over a bowl. Pour the water and grounds over the strainer and discard grounds.
- Pour the iced coffee concentrate into an airtight jar or pitcher and store in the refrigerator until ready to use. It will keep for up to one week.
- To make iced coffee, fill a glass with ice and add 1/2 cup coffee concentrate and 1/2 cup water. Add cream/sweetener as desired and serve.
 Hi! I’m Karen – I’m a real person with real recipes. No A.I. here! Since 2009, every recipe on Kitchen Treaty is thoroughly tested and loved before I hit “publish.” I’m a home cook, certified plant-based pro, and mom. I’m a vegetarian married to a carnivore, and my goal is to coexist deliciously.


I just started making my own concentrate too, but curious about something. After filtering the grounds, and the concentrate sits in fridge, there is “sediment” that settles to the bottom of the jar. Should I shake up the jar to mix it back in, or let it remain settled at the bottom and only pour out what’s above it? It’s not grounds because I filter those thru my nut milk bag. Thank you!
good instructions,well detailed
Thanks! I hope you love your cold brew! 🙂