And now for something completely different! I know I usually share recipes here, but today, I thought I’d go beyond the kitchen and share a recent project we completed here in the Kitchen Treaty house: Our gray and white half bathroom remodel!

I mean, from photos of dinner to photos of a toilet. Why the heck not?! 😉
wall paint / vanity / light fixture / faucet / towel ring / wall shelves / floor tile / fern scroll art
If I’d known how rewarding our downstairs powder bath remodel would be, I would have gone for it so much sooner! Instead, we put it off for years.
When we first moved into our house over five years ago, we noticed some dry rot around the base of the toilet in our hardwood-floored downstairs half bathroom. There was no current leak and it wasn’t getting worse. But we knew we’d need to replace the hardwood with a more bathroom-friendly flooring material at some point.
But other home improvement projects – those that I thought would be way more exciting – took precedent. Like our kitchen, which STILL isn’t done! It’s close, but not quite there.
Anyway, our half-bath remodel ended up being seriously satisfying – from start to finish in about three weeks. And the outcome? We LOVE it. Like, I just kind of want to hang out in there. Weird, but true.
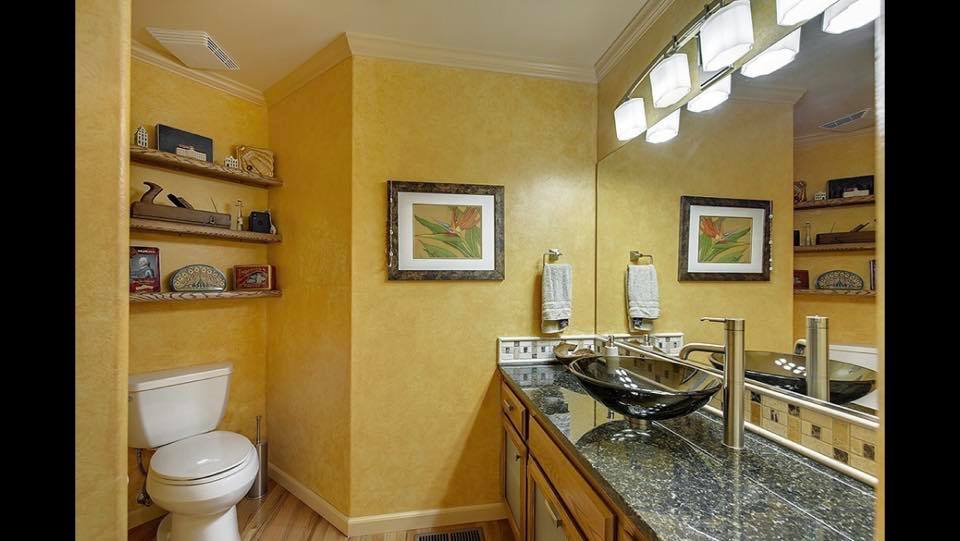
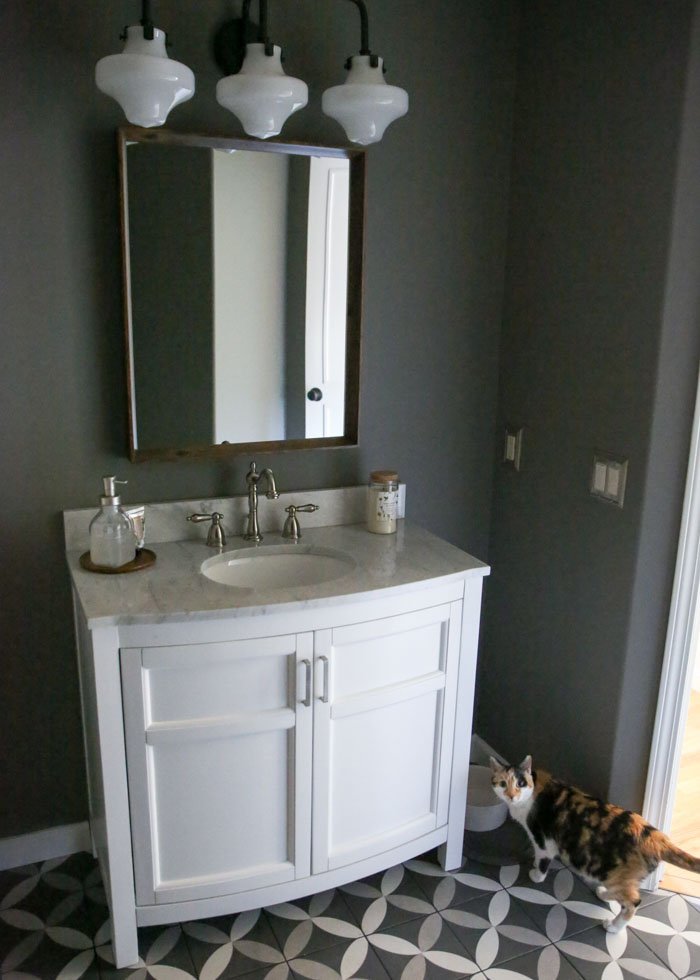
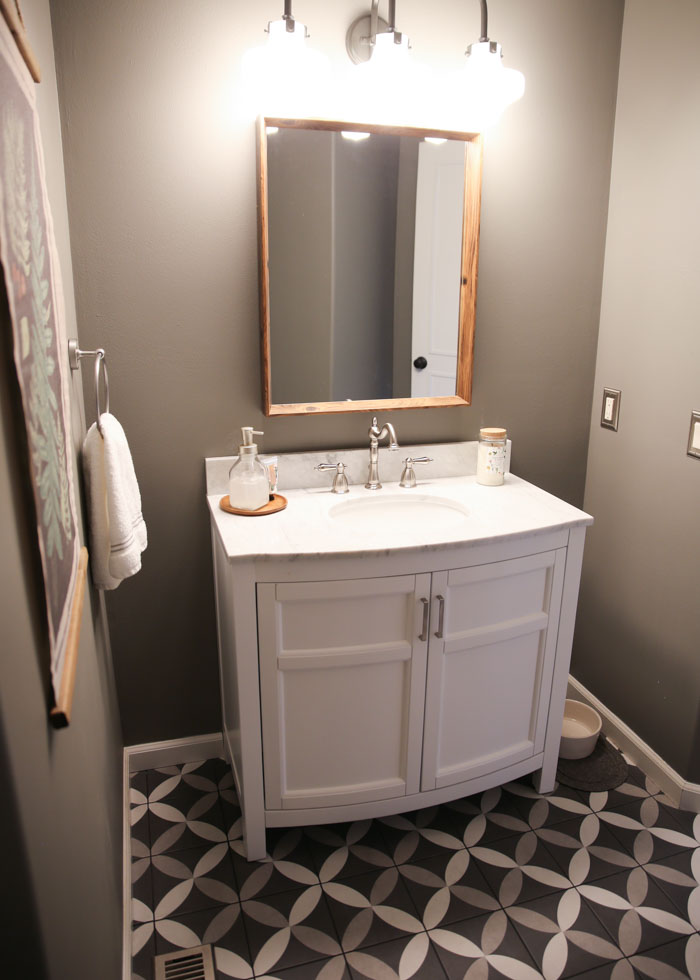
Okay, so here’s how it looked when we first bought the house. Sponged walls (all the rage back in the day!); elevated bowl sink (which by the way, my daughter and her friends thought was the coolest thing ever). All in a very odd-shaped bathroom that’s rather large for a powder bath but super awkwardly laid out, and with no windows, to boot.
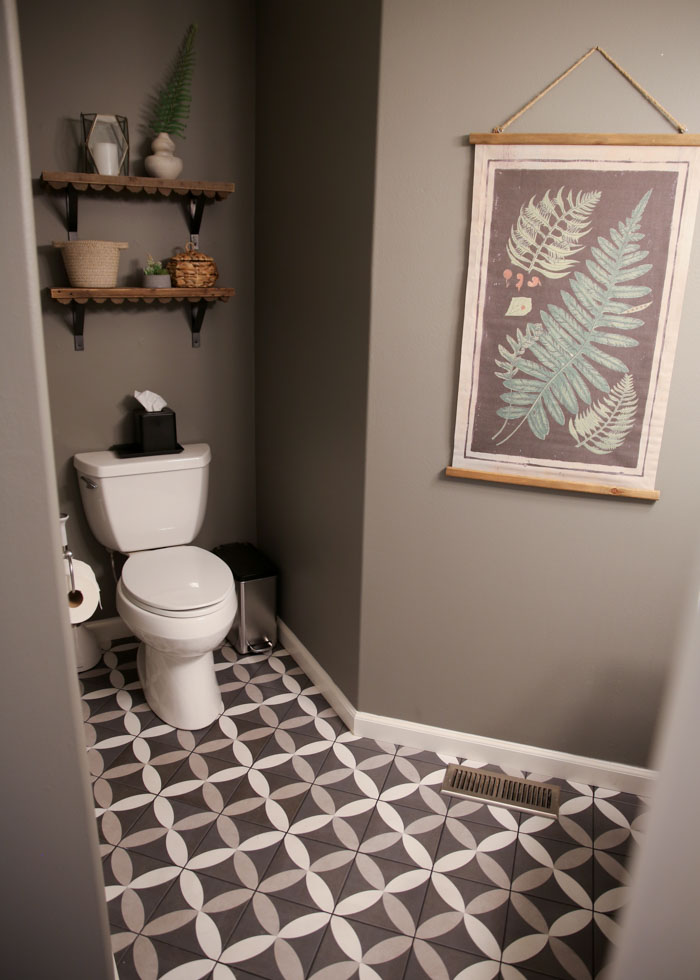
Eventually, my guy and I painted the walls and trim a creamy white to get us by until it was time to do the full remodel. And then finally, we went for it! Here’s what our windowless half bathroom looks like now (I don’t have a super wide-angle lens, so this is the closest I have to the before):
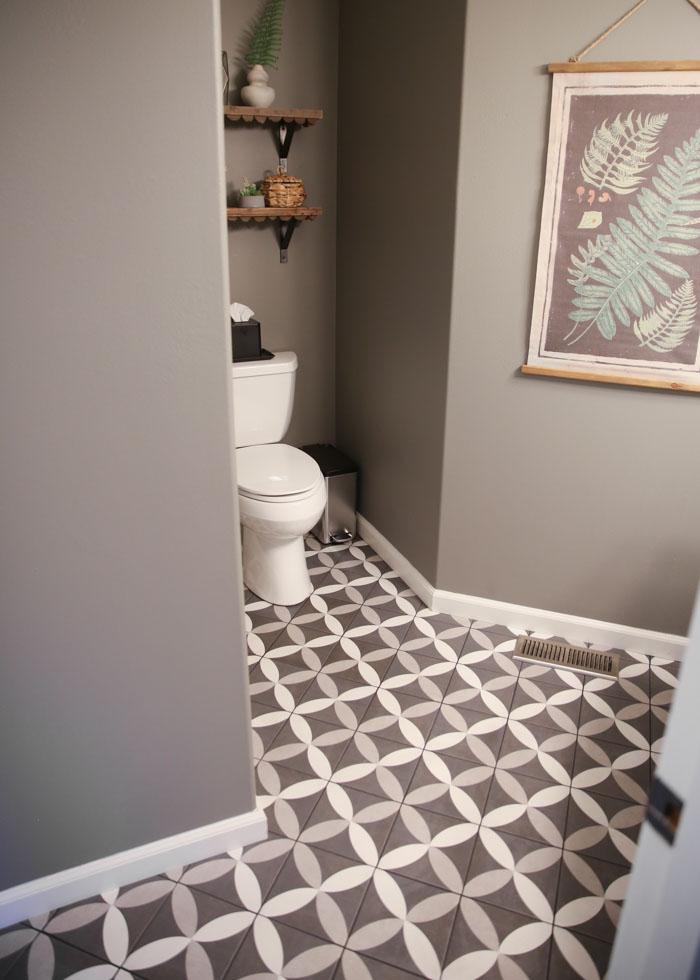
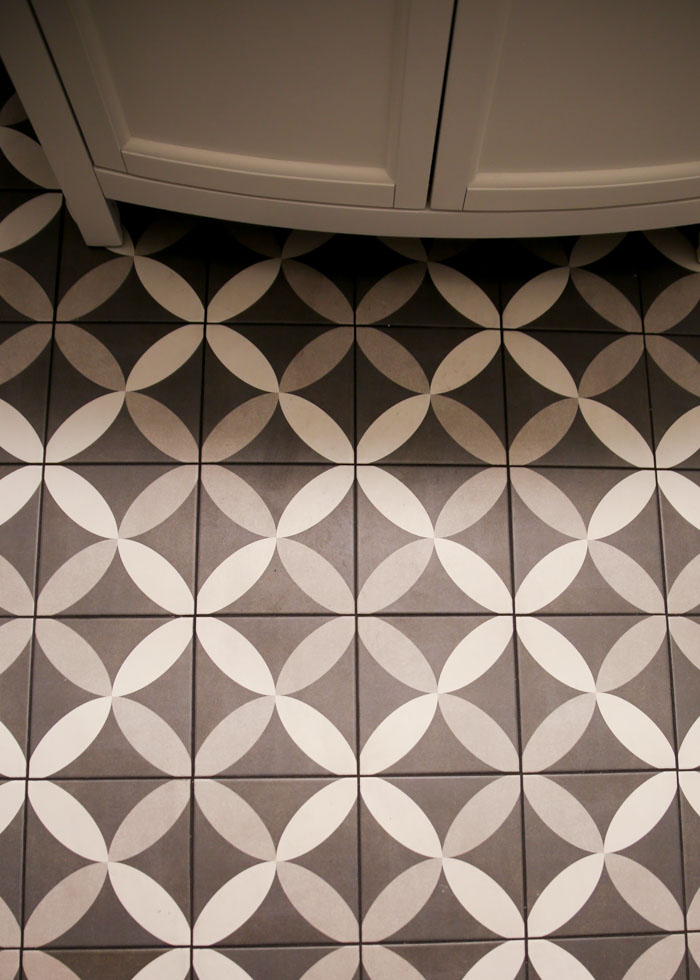
Our first decision was deciding to go with a daring (for us), graphic tile – because why not be a little playful and unexpected in the powder bath? These tiles mimic the popular cement tile look but are actually printed ceramic tile – much more affordable and a little lower-maintenance. We went with a dark grout so that it wouldn’t compete with the patterns the tile throws out, and we absolutely love it. The floor is what everyone comments on first – tons of compliments.
Along with the dark tile, I also decided to embrace the naturally dark, windowless situation by also going super dark on the walls. I considered charcoal or even straight-up black, but eventually dialed myself back to a nice, deep, rich gray – Chelsea Gray by Benjamin Moore. I love how it’s warm without being beige; gray without skewing green, blue, or purple. It might be the perfect darker gray!
For the vanity, we decided to remove the long, wall-to-wall unit and replace it with a freestanding, narrower unit. We lost some storage, but gained a spot to put the animals’ water bowl – a huge (and very intentional) bonus. Hi Fern!
(Can I just say how tough it is to photograph a tight, awkwardly shaped space with zero natural light? To all of you home decorating bloggers out there who make photos like these look effortless, I salute you. OH HOW I SALUTE YOU.)
Anyway, I shopped vanities for MONTHS, let me tell you. Originally, we were going to go with lighter walls and a rustic wood vanity, but every wood vanity I came across was super expensive – $1000+! A tough pill to swallow. We even bought an antique dresser and were going to convert it into a vanity by placing a round white vessel sink on top, which would have been so cute – but not so practical with a kid in the house. Eventually, we decided to go with the simple white vanity and the darker walls for contrast.
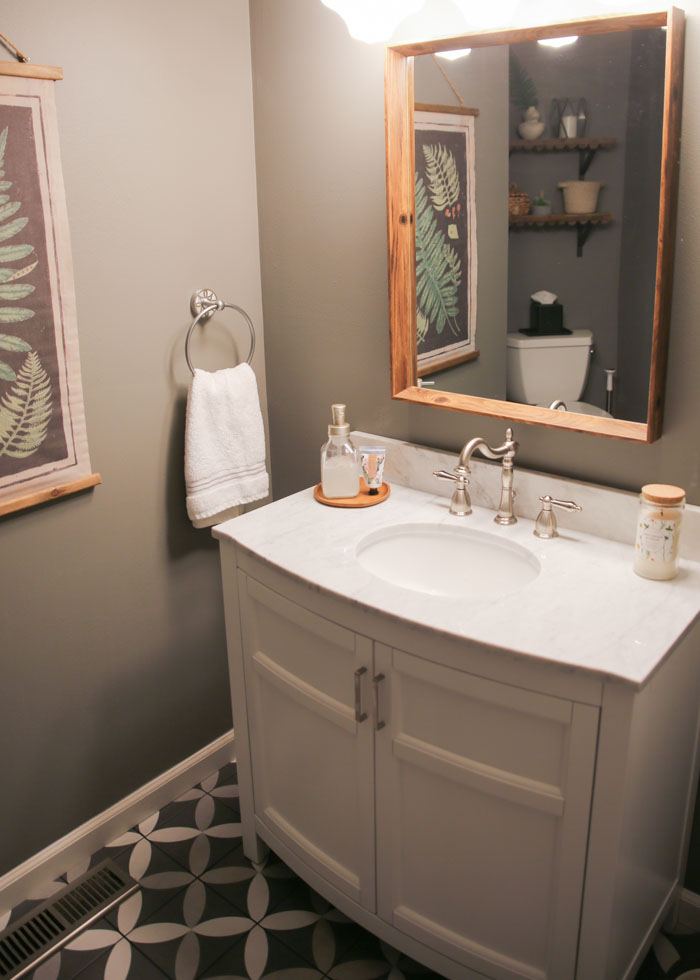
The vanity we ended up buying was from Lowes, and while it’s not the highest quality vanity around, it does have some nice soft-close doors and a cute curve along the front that gives it some personality. Plus, grey-veined Carrera marble countertops and backsplash strip to boot. All for under $500! Sold.
The light fixture is quite possibly my favorite element in the entire bathroom (aside from the tile). It took me forever to track down this industrial spin on schoolhouse lighting from Ballard Designs – the instant I finally laid eyes on it, I was sold. It isn’t satin nickel like the rest of the bath hardware, but in this nice matte black with white shades, it totally works. I wanted something that would take standard bulbs and had full shades because I wanted to put some 60-watters in that bad boy without it blinding all who entered.
This light fixture completely fits the bill and lights up our windowless bathroom perfectly.
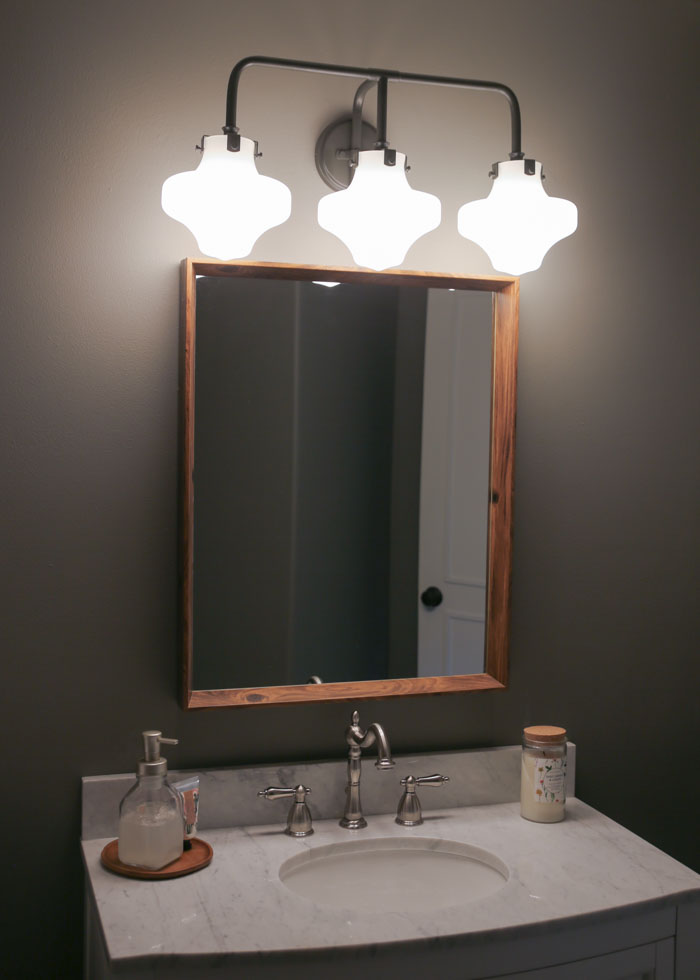
Initially, I really wanted two side sconces, but in the interest of keeping to our budget, we decided to use the existing electrical box instead of having to seal that one up and add two new. I’m over it now because again, I love the light fixture we ended up with.
The toilet paper holder and towel ring were Anthropologie splurges. They’re nice and solid, and best of all, have a pattern that mimics the petals on the floor. Score.
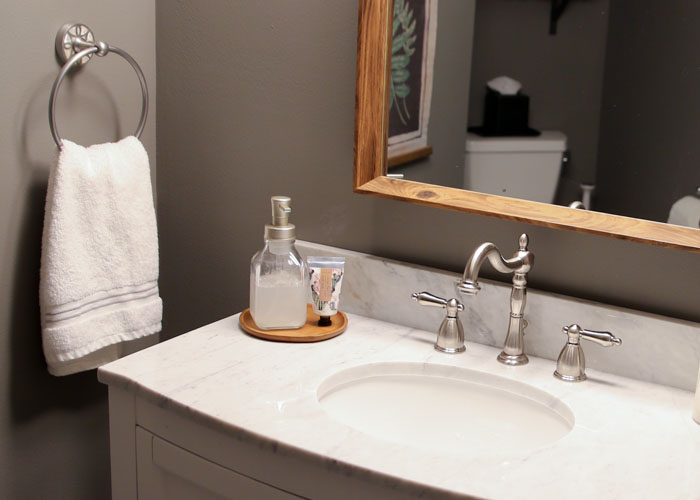
The mirror was a tough one. I really wanted to do something round or a fun, quirky shape. But because of the single light fixture above and the fact that we have a 4-foot person and a 6-foot person that will both want to look into it, I decided on a more practical rectangular shape. I found this mirror at a local superstore on clearance and it was a steal – only $30!
Lastly, we decided to add shelves behind the toilet for a bit of added storage and interest. Because of the large fern wall hanging, I felt we needed some smaller-scale items on the other wall for balance.
These rustic behind-the-toilet shelves are perfect, and – bonus – they hold a basket with a spare roll of TP and some first aid supplies in the woven bath canister (easy-to-access bandaids are important when you have a young kid in the house, I’ve learned). I love the juxtaposition between the sweet shape of the scallops and the rustic reclaimed wood rounds they’re made of. Meanwhile, my guy was just happy they weren’t floating shelves – his nemesis when it comes to installation.

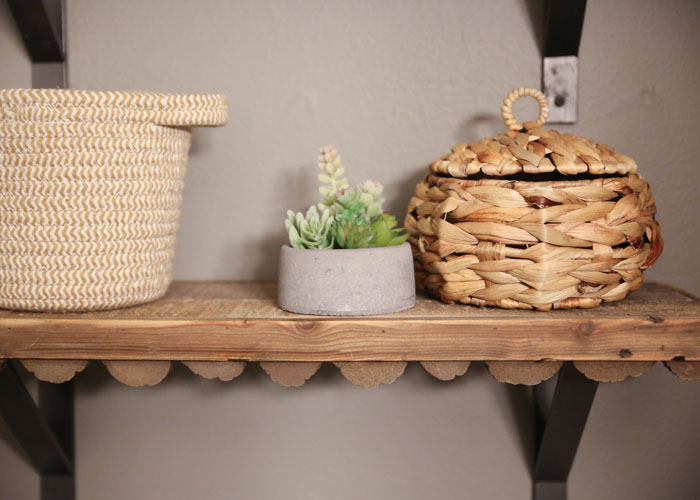
wall shelves / woven bath canister
All in all, we’re super pleased with how our powder room remodel turned out. It’s playful and fresh and, maybe best of all, no more five-year-old dry rot around the toilet. Woo hoo to the loo!
This post contains affiliate links. That means if you click a link and buy something, I may receive a small portion of the proceeds. Thank you for supporting Kitchen Treaty!
 Hi! I’m Karen – I’m a real person with real recipes. No A.I. here! Since 2009, every recipe on Kitchen Treaty is thoroughly tested and loved before I hit “publish.” I’m a home cook, certified plant-based pro, and mom. I’m a vegetarian married to a carnivore, and my goal is to coexist deliciously.


Ah I love the tile but the link doesn’t seem to work. Do you happen to remember where the tile is from? Thank you!!
I love the tile as well! Where did you purchase it from? The link does not work,
Hi, I got it from Wayfair. Here’s the link! https://www.wayfair.com/home-improvement/pdp/merola-tile-twenties-8-x-8-ceramic-patterned-wall-floor-tile-eml2184.html?refid=TEM_WF_732&mmid=1386991296&csnid=745D3A47-F351-4C21-ACD8-998F0CC2B476&libra_c=&libra_d=&libra_g=