I know, I know … white kitchens are everywhere. But you know, they’re everywhere because they’re awesome, amiright?! At least … I think so.
I wanted a light, bright, white kitchen for years, and almost two (yes, two!) years ago, we finally started the process toward getting one.
(Why did the project take two years? Well, we started before we had an ample budget, which is also the first thing I’m going to list in another post I’ll be publishing soon – all about the mistakes we made during the process. I do wish we’d waited until we had more money. But we didn’t, and so we DIYed a lot. And DIY – at least for us two slowpokes – takes time. The other big hold-up was that after our kitchen was remodeled, we still needed to refinish our wood floors [because we shifted the island around]. But by the time the kitchen was 90% done, we had maaaaajor renovation exhaustion. So, the floors didn’t happen until just this past summer, nearly two years later.)
But I digress. How about a couple of before-and-afters, before we go any further?
Before: Orange oak cabinets, black backsplash, a feeling of closed-ined-ness. (Terrible non-word. Apologies.)
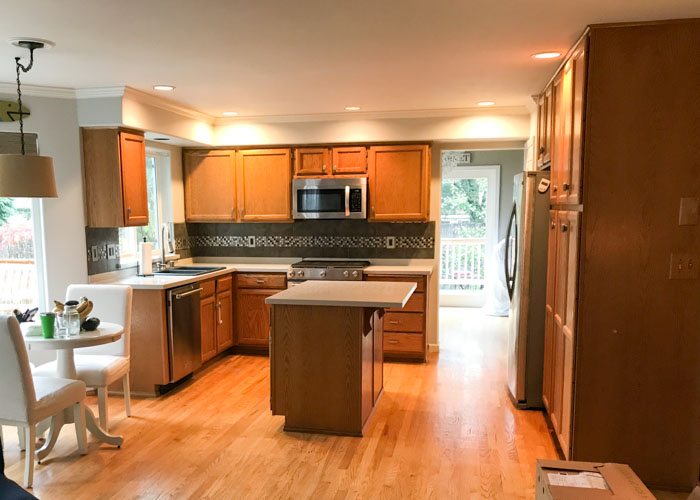
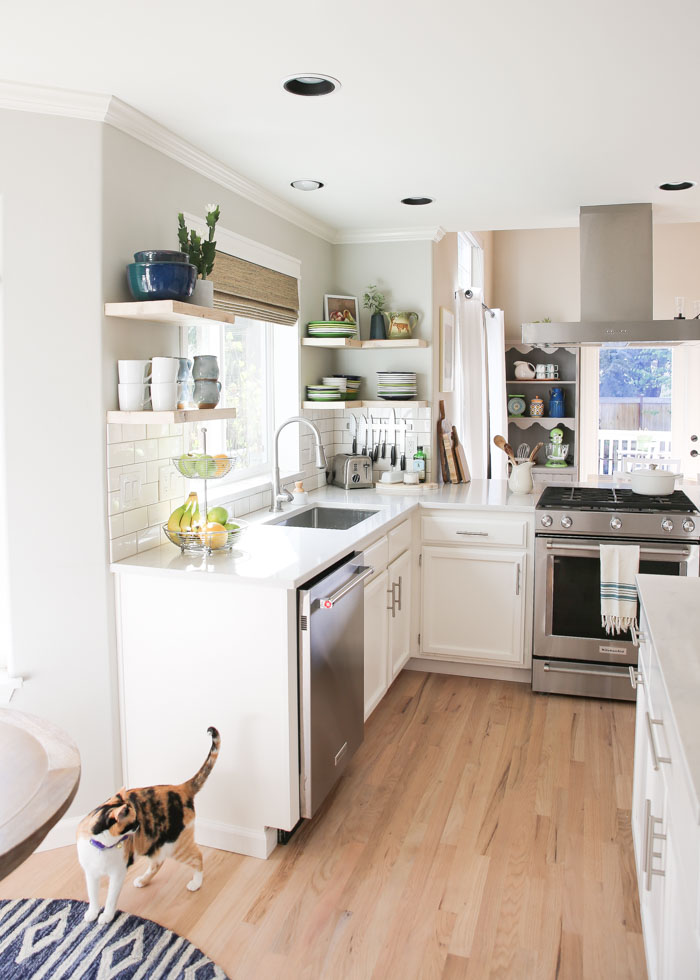
After: White cabinets, larger island, lighter and brighter, and all opened up. Ahhhh!

Here’s another angle, from the dining room side.
Before:

After. Look ma, no walls!

One more before:

Aaaand after:

So, want the specific scoop on our budget-friendly white kitchen remodel?! Here it is!
Removing a wall
We removed the wall between the kitchen and the formal dining room to open it all up (well – we paid a professional to do this, We did NOT do it ourselves!)
While it would have been nice to put in bar seating on the dining room side, our dining room was already rather small, so we added storage. And we loooove all that extra storage!
How we saved money
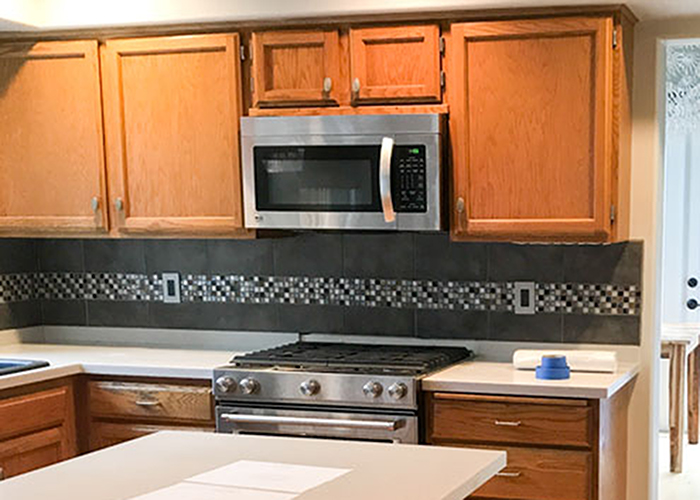
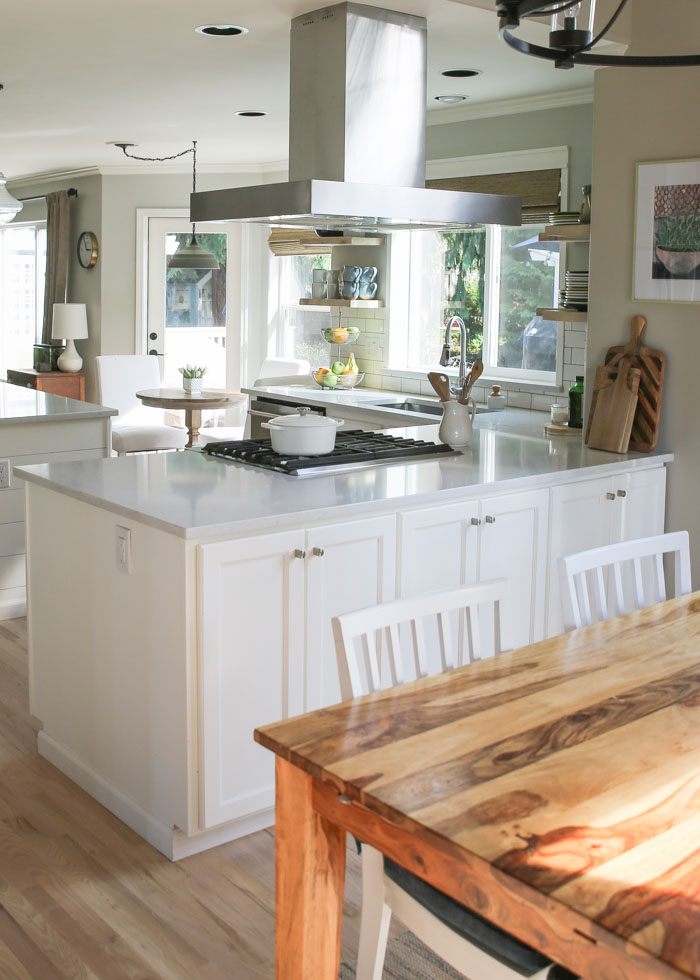
Instead of something custom and/or fancy, we bought a mid-grade, stainless steel vent hood from Costco. Nothing fancy, just functional – but not loud! Our last vent hood was loouuuud. This guy is nice and quiet, at least on the first setting (up the power and it’s a big noisy).
We also kept the same bank of cabinets on the stove side, then added a row of 18-inch-deep cabinets along the back. Our contractor placed a thin sheet of wood on the side, we added a bit of trim, and bam. You’d never know it’s a combo of new and old.
We also nixed the microwave altogether. We just didn’t use it enough to justify getting a new one or incorporating it somewhere into our design. Do we miss a microwave? Not at all! Though sometimes we have guests who do. 🙂
vent hood / bowman cabinet knob / plant print (claudette by Millie Shivas, discontinued) / brass picture frame
Removing a floor-to-ceiling wall unit & repurposing old kitchen cabinets
The previous owners put in a nice storage area that functioned as a pantry, but it just didn’t work for us. We wanted the counter space back. Bonus: It really opened up the space, making the kitchen feel larger, plus gave us room to sit at the island while people can still pass behind us.
The uppers and lowers were salvaged from old cabinets. Our contractor moved the upper cabinets from the wall we took down, and installed it on the refrigerator wall. Then we repurposed the old island, simply moving it over against the wall. Voila! Base cabinet!
We had a little extra space to fill, so he built in a wine rack above. Below, he added a spot for cookie sheets and wire cooling racks (we still need to decide if we want a door there or not and if not, we need to paint it white inside).
Then, we ordered two new paint-grade cabinets that were as close a match as possible looks-wise to the existing cabinets (if you look closely, there are differences, but we really don’t notice). The first new bank of cabinets opens up into the dining room, behind the stove. The second is the new island, which is about six inches longer than the original – and, with a built-in garbage drawer on the left and pull-out drawers, much more functional.
As far as painting the cabinets goes, after receiving quotes upwards of $5000, my guy and I decided to tackle this one ourselves. Oy! That was a TON of work. We did it right though – sanded the red oak cabinets down to bare wood, primed with good stuff, and painted with even better stuff. We could have used filler to so that no grain was visible, but grain didn’t matter to us, so we didn’t go there.
Hinges and handles were a huge pain. We wanted black, but once we realized some of the cabinet doors had to keep their external hinges and others would have internal hinges, we chose a color that didn’t stand out as much. Good ol’ brushed nickel to the rescue.
How we saved money on kitchen cabinets
Obvious, but repurposing those old cabinets and then painting them ourselves (Benjamin Moore White Dove). Also, the we got the cabinet hardware from Wayfair. We thought about doing something nicer and fancier but ultimately the standard bar handles worked best.
Before (from my “Small Kitchen Pantry” post):

After:

Moving the island
The island was super close to the stove before, and it made for a tight squeeze when two of us were in the kitchen. So we moved the island out by a foot, going from 36″ clearance to 48″ clearance. We also sprung for a counter-depth fridge to gain a little more clearance in the walkway between the island and the wall. Before, we didn’t feel like we could fit stools there. Now, we can! Amazing what a different a few small tweaks made to the overall function of the space!
Looks wise, we decided to dress the island up with a bit of faux shiplap. It’s simply plywood cut into even horizontal planks then nailed on and painted.
How we saved money
The barstools were inexpensive Wayfair open box finds, covered with slipcovers custom-made on Etsy. I needed something narrow enough to completely scoot under the island when not in use, but still be cushioned and comfy. The slipcovers (an Etsy find) are easy to wash after kids have wiped their chocolatey fingers on them and I’d like to think they lend a bit of rumpled French farmhouse flair. At least, I hope so – because there’s no way ironing the things!
Before:

After:

barstool / barstool slipcovers
Open shelving
Just like white kitchens as a whole, I know how ubiquitous open shelves are these days. But I love, love, love my open shelves! Removing the uppers in favor of shelves opened up the space, and they’re super functional. We keep all of our daily dishes on our open shelves (Fiestaware, forever Fiestaware), and they’re super easy to reach. Do they get dusty? Nah. We use them all too often; dust doesn’t have time to collect.
I like to change up my colors now and then, and with these open shelves, it’s super easy to just swap out my Fiestaware and a few decorative items and voila! Done! In fact, at Christmastime, I always break out the red and green Fiestware and it makes me so happy.
The neutral kitchen with easy-to-adjust accent colors was completely intentional. I like to change out color schemes far too often to have permanent colors in the form of, say, green cabinets. Which I do love! But a neutral backdrop is the practical choice for miss change-it-up-every-six-months me.
On the other side of the kitchen, we have a longer open shelf underneath one of the upper cabinets. It’s perfect for storing latte mugs and mason jars full of pantry items that we use a lot.
How we saved money on open shelving
Our open shelving was another DIY job. We bought these heavy duty brackets and used thick cedar from the local lumber yard, lightly whitewashing them then coating in poly.
Love ’em.

fiestaware / oil painting (original) / magnetic knife rack

pendant shade / white mugs / blue belly mugs

Classic subway tile backsplash
Yep, just inexpensive subway tile with gray grout. We toyed with more expensive/different backsplash tile, but ultimately, I didn’t like the fancy stuff any better than plain ol’ cheap subway tile, so why spend the money if we didn’t have to?
How we saved money
$1.20 per square foot. Need I say more?
Before:
After (in a different spot, because the above wall was removed):
Fresh new countertops
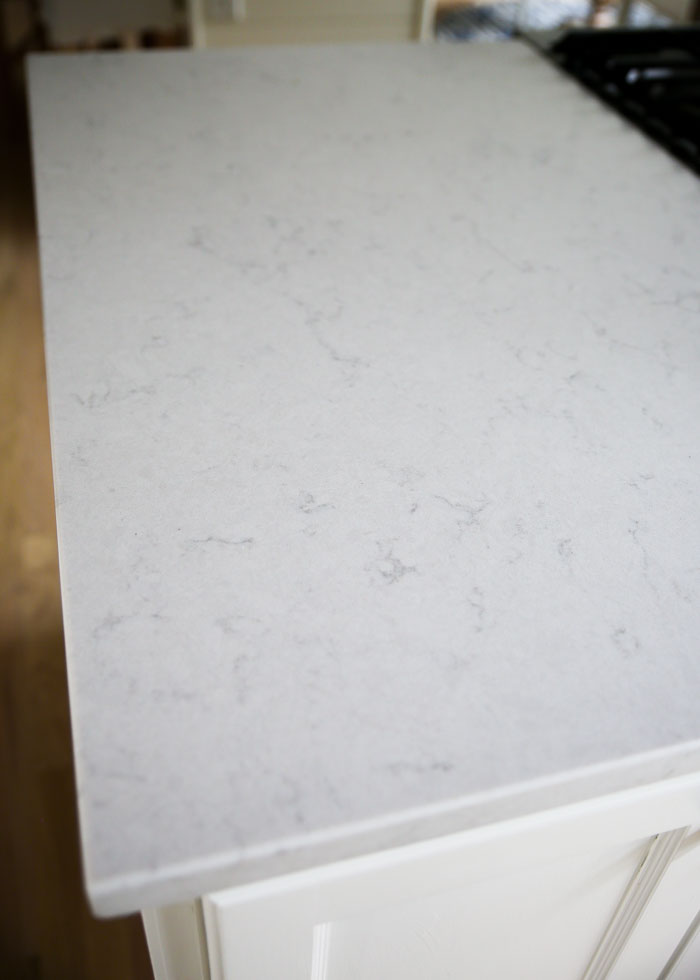
The countertops were such a tough decision! We didn’t hate the old ones (a high quality laminate material), but with the wall removal and additional reconfigurations, we needed to go for it. We finally settled on Lagoon from Silestone and have been super happy with them.
When I originally thought we were going to do this whole thing for under $5000 (ha! I’m so funny), we had planned to keep our old kitchen countertops. But it just wasn’t meant to be because some of the changes we made (removing the wall and making that area larger) involved differently shaped countertops. We love our new countertops, but they were nearly $5000 in and of themselves. Suffice it to say we didn’t do this whole thing for only $5000.
I will say deciding on countertops was the hardest decision by far. So much that I’ve written an entirely separate post all about the different materials, their pros and cons, and why we ultimately decided on quartz. Read all about it here: “Choosing White Kitchen Countertops: Marble, Granite, or Quartz?”
How we saved money on countertops
We bought the quartz during a 15% off sale at Lowes. We had a great experience with their installers and would use them again in a heartbeat!
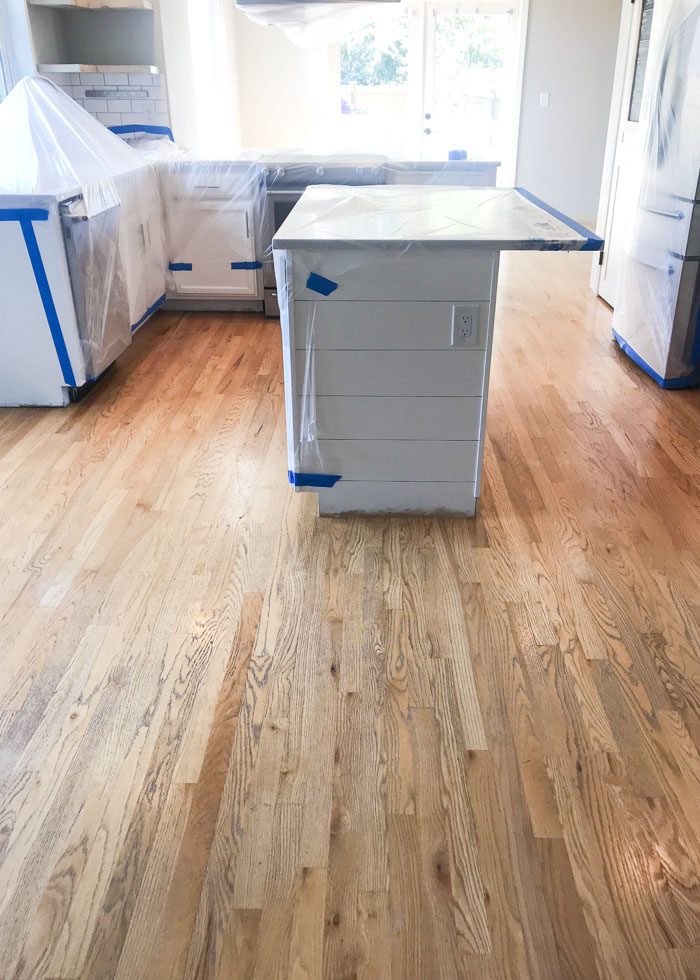
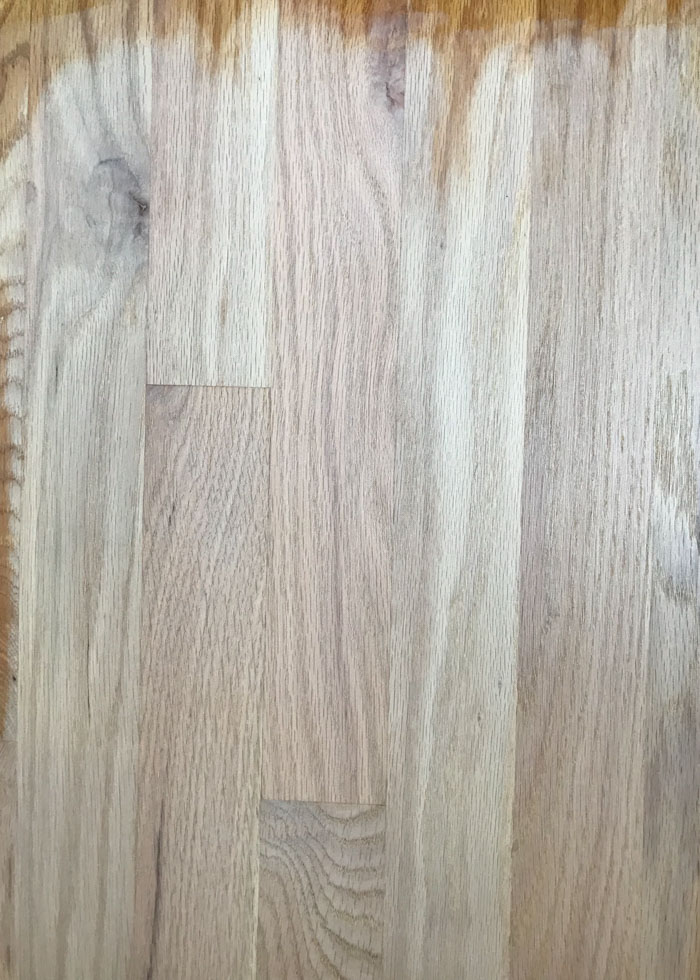
Refinishing the wood floors
Well, because we moved the island, revealing bare red oak floors underneath, we had to have our wood floors refinished. What a pain! We finally worked up the nerve to just git ‘er done this past summer. It involved moving out of our entire downstairs and it was completely disruptive but we’re glad it’s behind us.
We started out with red oak, and we had it sealed with Bona Nordicseal to give them a lighter, whitewashed look. The outcome was a little more pink/salmon than I’d hoped for, but I also knew going in that it was a risk we were taking. Because red (oak) + white = pink. But overall, we like them.
After the floors were sealed, they were coated with Bona Traffic HD, a nice soft matte finish which feels SO good on bare feet. We like this water-based finish because it’s not as toxic as Swedish. It’s not as durable, either, but we’re hoping all the inevitable scratches from pet claws etc. won’t show up quite as much with a matte finish.
We opted for a lighter color vs. a darker brown because we had already gone down the whitewashed road and we thought it would show less of our light-colored dogs’ hair. Of course, we brought a black puppy home a few weeks later!
Before:
Sample of what the Nordicseal would look like:
Aaaand after:

I guess that’s it! I have spent hours on this post and I feel like perhaps it’s time to stop while the stopping’s good.
But first, a few more pics!


dining chairs / dining table (similar) / dutch oven / cabinet knobs
Okay fine, just one more thing. Here’s a list of other ways we saved money on our white kitchen remodel. We were NOT organized and I don’t have a line-by-line situation. But I’ll add to this list as I remember!
Other ways we saved money on our budget-friendly white kitchen remodel
- We opted for a drop-in, under-counter stainless sink. I really wanted a nice big farmhouse sink, but our cabinets wouldn’t have worked with one. And honestly, I’m cool with the decision. I love our new sink!
- We kept our old faucet. It was perfectly fine.
- We didn’t splurge on lighting. We bought from Wayfair and an inexpensive fixture from Ballard Designs. They’re fine! Okay, I might still swap these out for something more unique at some point. But for now they’re fine.
Paint colors we used for our white kitchen remodel: Cabinets: Benjamin Moore White Dove / Walls: Benjamin Moore Gray Owl / Dining Room Walls: Benjamin Moore Revere Pewter
Questions? Comments? Please share in the comments below! And thanks for coming along on our little (big) kitchen remodel journey!
 Hi! I’m Karen – I’m a real person with real recipes. No A.I. here! Since 2009, every recipe on Kitchen Treaty is thoroughly tested and loved before I hit “publish.” I’m a home cook, certified plant-based pro, and mom. I’m a vegetarian married to a carnivore, and my goal is to coexist deliciously.


Karen, you missed your calling. Upgrading kitchens is what you should be doing. Such a grand remodel.
Haha thanks! But I would pull my hair out if I it daily for a living! 😉
Wow! This looks beautiful. Thanks for sharing the article.
Thank you!
I’ve been dying to see this! I love your attitude about it all, and it looks FABULOUS! Well done, I’m sure you are enjoying it immensely!
Thanks for sharing! Our kitchen is almost exacty the same configuration as your old kitchen. This gives us a lot of ideas! What a gorgeous transformation.
Thank you so much! I have to say, I spent waaaayyyy too long scouring the internet for pics of kitchens with the same layout and it was so satisfying when I would find something even somewhat close! So I’m glad this will help if you go down the same road. 🙂
How many coat of NordicSeal did you apply?
I believe our flooring person applied two.
Karen, this is so inspiring. I have been wanting to do a kitchen renovation for so long. It’s so hard to know where to start though.
Thanks so much, Arabella! Kitchen remodels can be super overwhelming. I keep meaning to write a post about what I’d do differently next time but the top two are 1) Wait until I have a decent budget and 2) Hire a kitchen designer first thing! I think #2 is a great first step.
Would love to know more about your pantry. Trying to decide on a walk in pantry or pantry cabinets. They are roughly the same size. I find our current walk in corner pantry is always a disaster !!
Hi Tiffany! I wrote more about my pantry here. I would love a larger pantry but this works pretty well! For us, much better than the cabinets did. https://www.kitchentreaty.com/how-we-organized-our-small-kitchen-pantry/
It’s beautiful! Love what it turns out into!
Your floors and kitchen look great! how many coats of the nordicseal did you use?
I think two coats? My memory is horrible! Sorry!
Hi there!
Beautiful reno!!!🤍 Where did you get your stools & chair covers?