“First crust and now pizza sauce? What, is she going somewhere with this or something?”
Why, yes! Yes I am! The culmination of my ever-so-epic three-part pizza series, which started with our very favorite homemade pizza sauce, will conclude tomorrow, Tuesday, with something, well … cute. Tasty and cute. That’s all I can say about it. I’ve sworn myself to secrecy. For now, though: our very favorite pizza crust for grilling.
Originally I was going to present this pizza crust recipe as our very favorite, period. But we grill our pizzas 90% of the time, and even though this pizza crust is also terrific in the oven, I’m not quite ready to stop experimenting with non-grilled pizza crusts.
But grilled pizza? This crust is it for us. It’s an olive-oil-based crust which means 1) amazing flavor and 2) it doesn’t stick to the grill. I discovered a pizza crust recipe some time ago in an issue of Sunset magazine and haven’t turned back.
I know what you’re thinking. “February? Isn’t it a little early to start talking about grilled pizzas?”
No way, man! We grill our pizzas year-round. On our barbecue in the spring and summer, sure. But we use a great grill pan for our pizzas in the winter. Overall we prefer the outdoor barbecue for its ability to achieve higher heats and more closely mimic a wood-fire oven, but the grill pan works wonderfully too.

First, a few tips for grilling pizza. And then, the recipe.
Five beginner tips for grilling the perfect pizza
1) Start with a very clean grill. Dough is more apt to stick to a dirty grill.
2) Use an olive-oil-based pizza crust like the one I’ve shared here. This, too, will help prevent sticking.
3) Top the pizza after you’ve grilled one side of the crust. Remove the crust from the grill and flip it grilled-side-up onto a pizza peel or baking sheet and apply the toppings to the grilled side. Then simply slide the pizza (uncooked side down) back onto the grill to finish cooking.
4) Be organized. Have all of your tools ready – pizza peel or large spatula, tongs for shifting the pizza on the grill if necessary, baking sheet or large cutting board for when you add the toppings and a place to put the finished pizza. Have all the ingredients ready before starting.
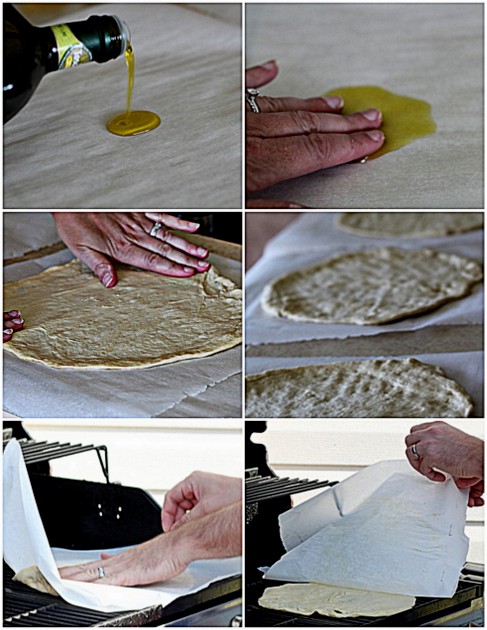
5) Until you get the hang of transferring the raw pizza dough onto the grill, use parchment paper. Cut a square of parchment paper slightly larger than the crust will be, then drizzle with a teaspoon or so of olive oil. Spread the olive oil on the paper, then work your ball of dough into your pizza shape directly on the parchment paper. When you’re ready, gently flip the crust onto the grill and peel off the paper.
Oh, and a very important bonus beginner tip: Let go of perfection! Your first few grilled pizzas will likely be lumpy, bumpy, bubbly, holey, and resemble the shape of Peru. Just go with it. I promise: it’s going to taste fabulous.
Parchment paper method for transferring pizza dough to your grill
Our Very Favorite Pizza Crust Recipe for Grilling + Five Tips for Grilling the Perfect Pizza
Ingredients
- 1 1/2 cups warm water (100 – 110 degrees)
- 2 1/4 teaspoons or one packet active dry yeast
- 1/4 cup olive oil (plus a little more for oiling the parchment paper and working with the dough)
- 1 1/2 teaspoons kosher salt
- 4 cups all-purpose flour
Instructions
- Mix the dough
- Stir together the yeast and water in the bowl of a stand mixer fitted with a dough hook. Make sure your water is between 100 – 110 degrees (just a tad above lukewarm, but I always use a thermometer to be sure). Too cold, and the yeast won’t activate. Too hot, and the heat can kill the yeast.
- Let sit until the yeast dissolves and begins to get a little foamy, about 5 minutes.
- With the mixer on low speed, add the olive oil, salt, and flour.
- Knead the dough (the mixer does this for you)
- Once the ingredients are fairly well incorporated, turn the mixer to medium speed to begin the kneading process.
- Knead (continue the mixer on medium) for about 8 – 10 minutes, until the dough is smooth and elastic. It should be very stretchy – it will just kind of stretch and fall off of the dough hook when ready.
- Let the dough rise
- Cover the bowl with a clean towel and set in a warm-ish place away from drafts. I use a spot next to the stove on the kitchen counter or the dining room table. Let rise until doubled in side, about 90 minutes.
- Punch the dough down, and let rise again for about 30 more minutes, until doubled again.
- Shape the dough
- Prepare six sheets of parchment paper. Lay the sheets on the counter or table, then drizzle each with a little olive oil.
- After the dough is finished rising for the second time, remove it from the bowl and place it on a floured surface.
- Cut the dough into six pieces.
- With your hands, smear the oil on a piece of parchment paper, then grab a dough ball – you want spread the oil on the paper and handle the dough with well-oiled hands, so it all works out.
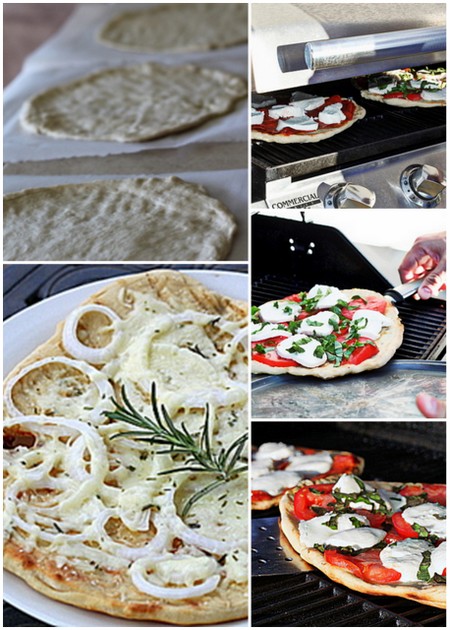
- Now you’re ready to shape the crust. You can place the dough on the parchment paper and just kind of spread it out into a circle with your fingers, or you can do like I do and shape it in the air first. I hold on to the edge and quickly rotate the dough so that it stretches and forms a nice flat shape, and then I place it on the parchment and stretch it out the rest of the way. I like to keep the dough on the thin size and about the size of a dinner plate. Much bigger and it can become difficult to handle on the grill. Note: If your dough shrinks and won’t work with you, let it sit for about 5 minutes and try again. Another note: If the shaping process seems awkward and frustrating, don’t worry! It will get easier and easier, the more you do it. And even when the crust assumes some crazy alien shape, your pizza will still be delicious.
- One last quick rise
- Let the shaped crusts rise on their parchment paper for about 10 minutes, until they start getting puffy.
- Now grill and eat!
- Now start grilling! With the grill on medium-high (about 350-400 degrees), flip a round onto the grill – dough side down, parchment side up. Peel off the paper.
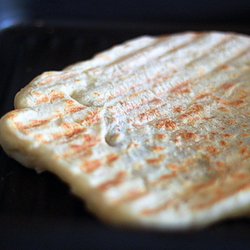
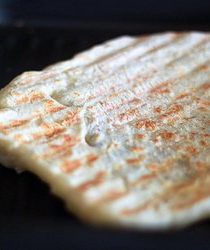
- Cook covered for 3 – 4 minutes, until the crust puffs on top and gets grill marks on the bottom. If the dough sprouts any big bubbles, go ahead and pop them if you can.
- Transfer the crust to a cookie sheet or large platter, grilled side up.
- Add your toppings and transfer back to the grill. Cook until pizza crust is cooked through, the toppings are hot, and the cheese is bubbly, about 3 – 4 minutes. If you have a barbecue with a lid, cooking them covered at this stage helps heat the toppings.
- Remove from the grill to a pizza peel or large baking sheet, Cut into wedges and serve.
 Hi! I’m Karen – I’m a real person with real recipes. No A.I. here! Since 2009, every recipe on Kitchen Treaty is thoroughly tested and loved before I hit “publish.” I’m a home cook, certified plant-based pro, and mom. I’m a vegetarian married to a carnivore, and my goal is to coexist deliciously.


Super cool! It’s hard to think about grilling outdoors given how cold and windy it is in Chicago, but I will definitely pin this for when it warms up. I’ve been lazy about grilled pizza and using a stone on the grill….looks like this dough will help me break that crutch.
I just got a grill pan and I’ve been trying to think of fun things to do with it. Grilled pizza? Is definitely a fun thing. I feel so lame because when I’ve grilled pizza in the past, I’ve just used the store-bought dough. 🙂
Pingback: Lemon Blueberry Yogurt Pancakes | Kitchen Treaty
Pingback: Grilled Individual Heart-Shaped Pizzas | Kitchen Treaty
I love grilled pizza. In my opinion it is the ONLY way to go. The crust is always nice and crispy. Great tips also!!
Pingback: Brown Sugar Garlic Mozzarella Breadsticks | Kitchen Treaty
Pingback: Radish & Goat Cheese Pizza with Spicy Mixed Greens & Optional Chicken | Kitchen Treaty
Pingback: Susan Sontag: Pizza Margherita | Paper and Salt
Transformative! Really, a recipe for fun dough to work with and incredible grilled crusts, thank you!
I made this grilled pizza dough for a guy friend of mine that I wanted to impress. I stay in an apartment complex where grilling is forbidden, thank God i had a stove top griddle with a reverse grilling side (not the same but it worked). I grilled both sides then put my toppings on, finishing the pizza in the oven. I was so nervous about how it was going to turn out because he took the first bite. He just kept complimenting and complimenting. Cant go wrong with that!
I topped it with homemade marinara sauce (can of pureed tomatoes and herbs), chopped chicken, sauteed broccoli slices, thinly sliced beef sausage, asiago and smoked gouda cheese then topped it off with a little drizzle of truffle oil. SO YUM!
Hi! I’d really like to try this recipe but I don’t have a stand mixer. Any suggestions?
Thanks!
Pingback: Is Vegan Cooking School Austin | Pizza Cooking
Pingback: How Can I Vegan Cooking Recipes For Health And Happiness | Pizza Cooking
Pingback: Making Vegan Cooking Replace Eggs | Pizza Cooking
Pingback: Why Do Vegan Cooking Lessons | Pizza Cooking
I’ve been telling my husband that I want to grill pizzas now that the weather is getting nicer. Great post – loving all your tips!
Can you easily double this?