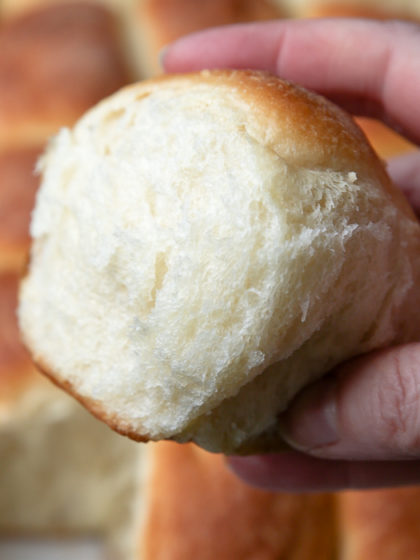

Put simply, these Dairy-Free Dinner Rolls are THE BOMB. Soft, fluffy, buttery, and total people-pleasers – no one will know they’re dairy-free and vegan, except the vegans (who will be oh-so appreciative!)
I published this dairy-free roll recipe a few years back, and it’s since received tons of five-star reviews. People love this roll recipe!
These Dairy-free Dinner Rolls are a traditional yeast-based roll, and we all know yeast can be tricky – but never fear, this post has all the tips you need for perfect vegan rolls every time! Read on for all the goods.

In this Article
- The Story Behind The Recipe
- Dairy-Free Dinner Roll Ingredients
- How to Cut & Shape Your Dinner Rolls
- Five Tips for Successful Dairy-Free Dinner Rolls
- 1. Mind Your Yeast!
- 2. Keep Your Dough on the Sticky Side
- 3. Find the Perfect, Warm(ish) Place for the Rise
- 4. Butter the Tops for That Nice Golden Color
- 5. Know when to cut your losses
The Story Behind The Recipe
Yep, it starts with a Grandma. I know, I know – how original … but mine was pretty awesome.
My grandma, or “Gran” as we called her, made the most epic dinner rolls. Soft, fluffy, a little sweet, and a lot buttery … pure heaven. She would bring them to every holiday gathering and we kids would grab at them like they were going out of style. Grown-ups too.
Even better were leftovers. For breakfast next day we’d slice them thin, pop them in the toaster, then generously butter them for the most glorious “toast” ever.
My Gran jotted down her recipe after many requests from family, but her writing was a bit hurried, and try as I might to translate it, I’ve never been able to replicate her rolls – not even close. That is, until now! Even better, I’ve turned them into dinner rolls without eggs and dairy-free rolls too – fully vegan, but no one will know.

Gran didn’t usually crowd her dinner rolls in a pan like I’ve done here – she’d space them on a cookie sheet for maximum browning on all sides. Sometimes I like to cook this vegan dinner rolls recipe that way. But today, I’ve got the crowded, store-bought-but-not-perfect-enough-to-be-store-bought-and-that’s-a-good-thing thing going on here.

Readers say …
– Natasha
“I’ve been trying to perfect vegan dinner rolls for years. This recipe was easy to follow and rolls turned out delicious. Even my non vegan family members loved them!!”Dairy-Free Dinner Roll Ingredients
This recipe swaps in Earth Balance, a vegan butter, for the butter typically found in dinner roll recipes (or, in Gran’s case, margarine – which, incidentally, can often be vegan!)
For the milk, I’ve found unsweetened soy milk has the best taste (I also tried these with almond milk but the almond milk lended a not-so-pleasant taste. Soy it is!)

Many dinner roll recipes call for eggs, but with these being vegan dinner rolls, I’ve left the egg out and added a bit more butter instead. I honestly don’t notice a difference between this dough and the enriched/egg situation, which was a happy and somewhat surprising discovery.
Plus active dry yeast, flour, salt, and sugar – the sugar is for a bit of sweetness and for the yeast to feed off of.
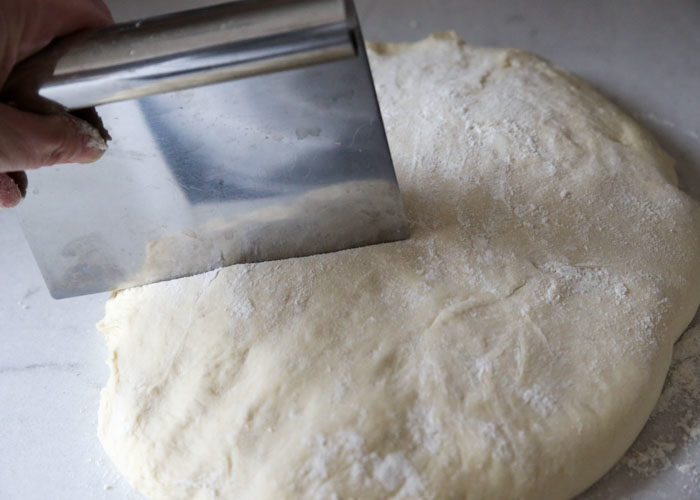
How to Cut & Shape Your Dinner Rolls
Once your dough has risen and is ready, it’s time to shape it into rolls! I thought I’d include some photos here of that process – a picture is worth a thousand words and all that.
First, place the dough on a lightly floured surface. Then, using a knife or bench scraper, cut the dough into quarters, then cut each quarter into 5 equal-ish pieces.
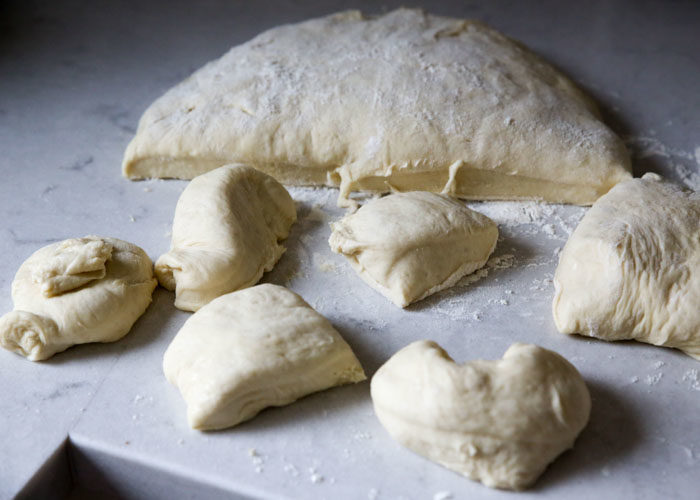
Next, take each piece and fold the corners down toward the bottom until they meet and stick, to make a ball.
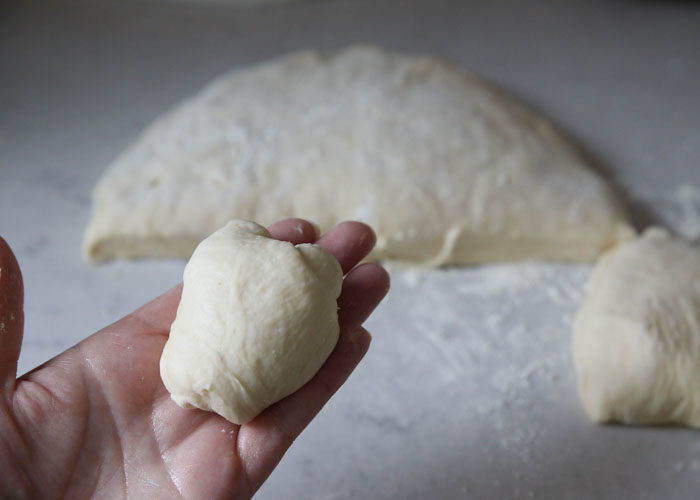
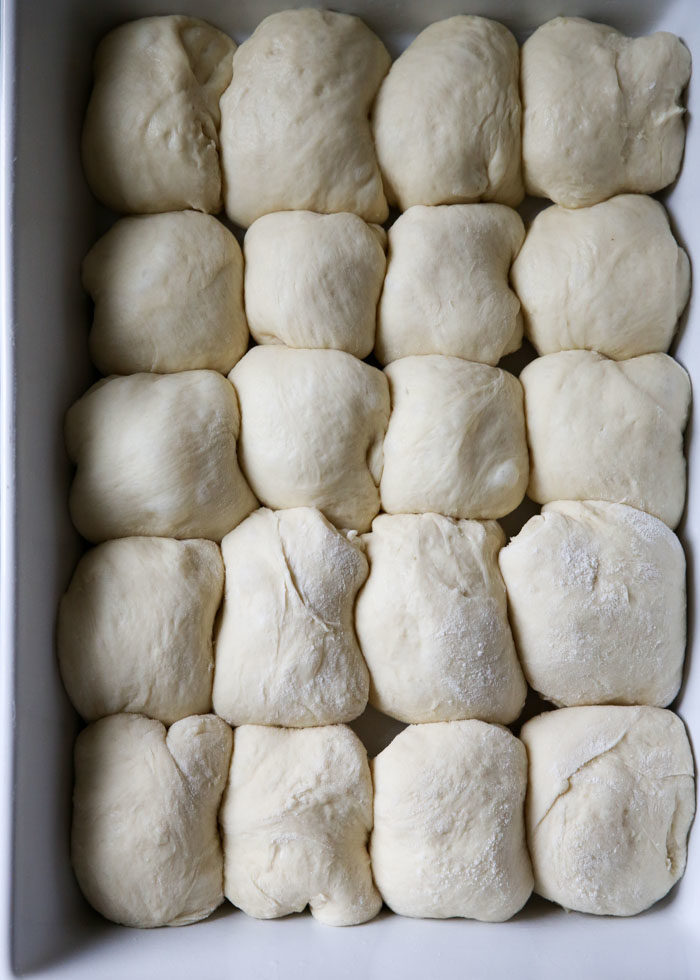
And then line them up in your pan!
Five Tips for Successful Dairy-Free Dinner Rolls
Okay, before we go any further, I want to share with you a few things I’ve learned over the years when it comes to yeast rolls.
I’ve found there are a few key tricks to churning out perfect vegan dinner rolls:
1. Mind Your Yeast!
- Your yeast packets should be one year old or less.
- Liquids should be between 100 – 110 degrees Fahrenheit before stirring the yeast in. I use a thermometer to determine the temperature of the liquid, because my hands change temperature too much and I can’t tell just by touch how warm (or cool) the liquid is.
- Feed it sugar. When proofing the yeast (proofing = activating, by the way), add sugar, but hold the salt. Yeast feeds on sugar. Salt, on the other hand, can kill it.
- If your yeast is bubbly after about 5 minutes of proofing, you’re on the right track!
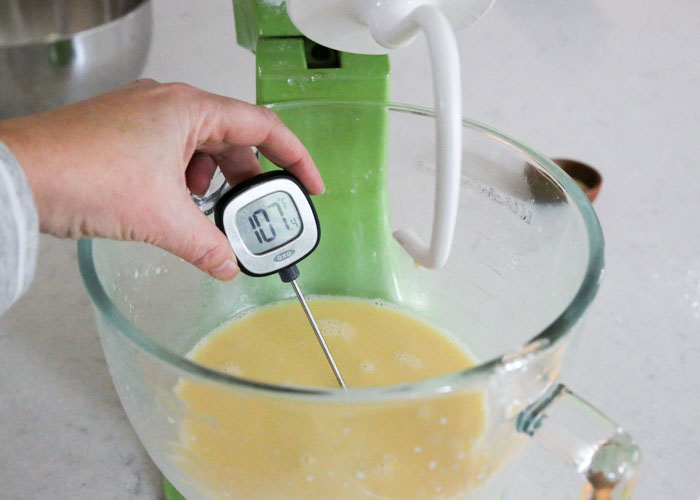
Liquid temperature is between 100°-110° Fahrenheit. You’re good to go! 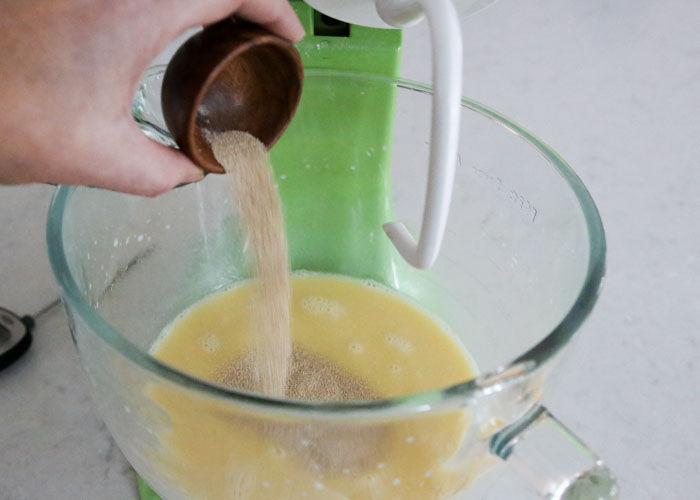
Adding the active dry yeast … 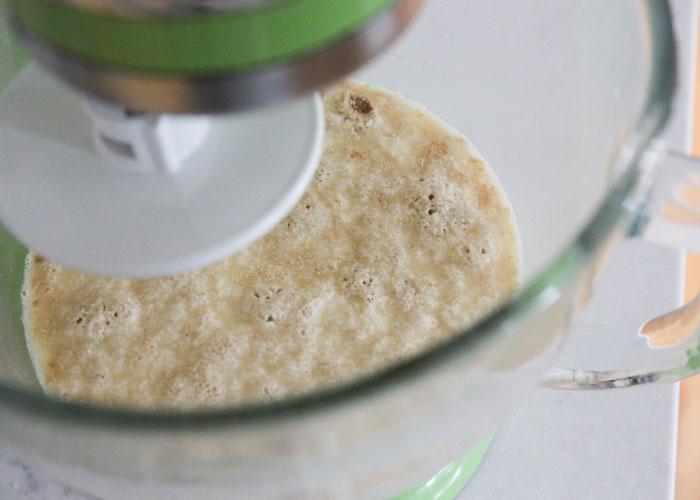
After 5 minutes. Look at those bubbles! It’s allliiiive! 2. Keep Your Dough on the Sticky Side
I used to put way too much flour in my dinner roll attempts – now I know better! I err on the side of keeping the dough pretty sticky and wet. I use (and recommend) a stand mixer, and once about 3/4 of the dough is balling up on the beater but the rest is sticking to the bottom immediately after adding the flour, I stop adding flour. When I turn it out to place it in a bowl to raise it, a bit is going to stick to my hands. And that’s okay! If that happens I know I’m on the right track.
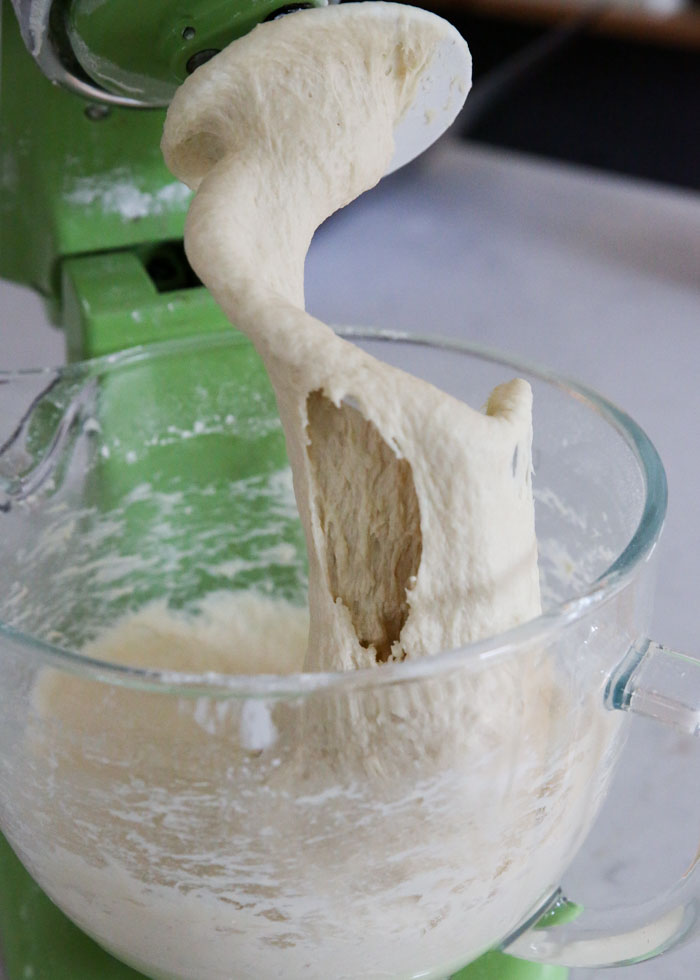
This photo shows the dough after kneading in the stand mixer for 5 minutes. It’s still pretty sticky – but perfect! 3. Find the Perfect, Warm(ish) Place for the Rise
There’s a particular spot on my kitchen counter, to the left of the range and where the sun tends stream in the window, where my dough is most likely to rise.
I’ve also found that now that we have newer, colder quartz countertops, my dough isn’t as happy. So I set the bowl on a trivet or potholder.

4. Butter the Tops for That Nice Golden Color
Pretty self-explanatory. Don’t skip this step!

5. Know when to cut your losses
If your yeast doesn’t bubble or your dough (for this particular recipe) doesn’t double in size within 60 minutes, it’s probably not worth your time to continue with the recipe. I’ve found whenever I power through with a failed proofing or dough, the result is really not worth the effort. Better to toss it and start over.
Okay, now that you’re armed with tips, are you ready to dive in? Let’s make the softest, fluffiest vegan dinner rolls around! Here’s the recipe.
(Oh, and I just have to point out that your rolls might just LOVE one of these vegan compound butters. YUM!)

Dairy-Free Dinner Rolls
Please the vegans and dairy-free eaters without disappointing the carnivores. These soft, fluffy, buttery, and melt-in-your-mouth dinner rolls are total crowd-pleasers – no eggs or dairy needed.Ingredients
- 6 tablespoons + 2 tablespoons vegan butter (divided; I use Earth Balance)
- 2 cups unsweetened soy milk
- 1/2 cup water
- 2 1/4 teaspoons active dry yeast (one packet) (not instant)
- 1/3 cup granulated sugar
- 1 1/2 teaspoons salt
- 5-6 cups all-purpose flour
- 2-3 teaspoons canola oil (for greasing the pans only – not for the dough!)
Equipment
- Stand mixer
Instructions
Make the Dough
- Add 6 tablespoons of Earth Balance to a small sauce pan. Set on your stovetop over very low heat, until melted. Add the soy milk and water. Continue heating until the temperature hits about 115 degrees (it will cool off a bit when you add it to the bowl of your stand mixer).
- Pour warmed butter and milk mixture into the bowl of your stand mixer. Add the sugar and stir to combine.
- Check the liquid with the thermometer again to make sure the temperature of the liquid is between 100-110 degrees. Most say this feels warm but doesn't sting your hand to the touch. For me, the only way to really tell is to use a thermometer. You can use a meat thermometer or a candy thermometer. The reason temperature is so important is that if the temperature is too low, the yeast won't activate. If it's too warm, it will kill the yeast.
- Once the liquid is between 100 and 110 degrees Fahrenheit, add the yeast and stir to combine. Let sit 5 minutes, until bubbly, then stir in the salt.
- With the dough hook on the stand mixer and the mixer on low speed, add the flour, 1 cup at a time, until the dough starts to look shaggy when the flour is added but is still relatively loose and wet. When you have the right amount of flour, the dough will cling to the hook for a moment and then begin to fall back into the bowl. Once you're there, resist adding more flour! It usually takes about 5 1/2 cups for me, but it can really depend on if you ended up adding a bit more or less liquid.
- Increase the speed to medium and knead 4-5 minutes until the dough is smooth and elastic. It will be soft and relatively sticky but you should be able to handle it without getting too much on your hands.
Let the Dough Rise
- Rub a little neutral oil (I use canola) in a large bowl and transfer dough to the bowl. A bit will probably stick to your hands but that's okay! Let rise until doubled in size, 30 minutes to 1 hour.
- Punch down the dough. Prepare a surface by sprinkling a tablespoon or two of flour on it. Turn the dough out onto the surface. It might still be a little sticky but soft and smooth to the touch.
Cut the Dough into Rolls
- Using a bench scraper or large knife, cut dough into quarters and then cut each quarter into 5 pieces roughly the same size. Don’t worry if they’re not exactly equal.
- Grease a large rimmed baking pan, approximately 9″ x 13″. I like to rub my pan with a teaspoon or so of canola oil. Take each piece of dough, fold the four corners onto the bottom to form a round shape, and place in greased pan. You should have 20 rolls or 5 rows of 4 rolls each.
Now for the Second Rise
- Cover with plastic wrap. Let the rolls rise until almost doubled, about 20 minutes. Meanwhile, preheat oven to 375 degrees Fahrenheit.
Brush with Butter and Bake
- Set remaining 2 tablespoons of vegan butter into a small saucepan over low heat to melt. Remove plastic wrap from risen rolls and brush the tops gently with the melted vegan butter.
- Bake until golden and a thermometer inserted into the center of the rolls registers at about 195 degrees Fahrenheit, 25 to 35 minutes. Remove from oven and set on a cooling rack until cool to the touch. Enjoy immediately or serve later.
Video
Notes
Rolls keep at room temperature for about 5 days (I like to keep them in a sealed zipper bag). They also freeze well.Tips for Success
- Make sure your yeast has not expired – it should be one year old max.
- Liquids should be between 100 – 110 degrees Fahrenheit before stirring in the yeast. I use a thermometer.
- Feed it sugar. When proofing the yeast, add sugar, but hold the salt. Yeast feeds on sugar but salt can stifle it.
- Your yeast should be bubbly after about 5 minute
- Once about 3/4 of the dough is balling up on the beater but the rest is sticking to the bottom immediately after adding the flour, stop adding flour. The dough will still be a bit sticky. That’s good.
- If your yeast doesn’t bubble or your dough (for this particular recipe) doesn’t double in size within 60 minutes, it’s probably not worth your time to continue with the recipe. I’ve found whenever I power through with a failed proofing or dough, I’m better off tossing it and start over.
Nutrition Facts
Serving: 1roll, Calories: 175kcal, Carbohydrates: 28g, Protein: 4g, Fat: 5g, Saturated Fat: 1g, Sodium: 221mg, Potassium: 75mg, Fiber: 1g, Sugar: 4g, Vitamin A: 264IU, Calcium: 35mg, Iron: 2mgThis post may contain affiliate links, which means if you click on a link and make a purchase, I may receive a portion of the proceeds. More about this here.
 I’m so glad you’re here! I’m a vegetarian home cook, certified plant-based pro, and mom. I’m married to an enthusiastic carnivore, and my mission is to achieve peace in the kitchen – one tasty recipe at a time. These days, with a name like mine, I also try not to ask to speak to the manager.

THE BEST
THANK YOU
I failed so many times and stopped making any kinds of dairy free bread- bread roles….
I used soy milk, earth balance butter and king Arthur all purpose flour ( 5 1/2 cups sifted )
They turned our PERFECTLY!!!
Next time I would try different dairy free butter since I don’t really like the taste of earth balance.
Yay! So glad these were a hit. 🙂 Happy holidays! Oh, and I love Miyokos vegan butter – might be worth a try. 🙂
I’m currently making these and I used all 6 cups of flour. The dough is incredibly sticky and even with flouring the surface to cut it into the portions, it stuck to the surface really bad. Should I just try adding more flour?
Yes, just a bit more flour – just enough to prevent much sticking. The dough should be fairly wet. 🙂
Gah! These are excellent. I made the dough now, planned to put them in the fridge after shaping, before final rise, and bake them off tomorrow, Thanksgiving Day. I had an extra roll, didn’t fit in the pan, so I let it rise and baked it off. It’s amazing. Thank you!
I used Oat milk, FYI, since that’s what I always have on hand, and it worked wonderfully. They might be even better with soy, but I’m not sure I could avoid eating them all if they were better. 😉
I’m so glad they are a hit for you! Thanks so much for your review and Happy Thanksgiving!
What a great vegan recipe! I am new to exploring vegan recipes and must say that I am quite impressed! I can tell that you are passionate about your creations! Having been baking and creating recipes since I was 8 years old, I can relate! It is such a beautiful thing to share!
I will work on a gluten free version and let you know when I find the perfect alternative for gluten sensitivities. Once I do have the perfect recipe, I would love to post it on my website and include a link to your recipe! 😊
Happy Thanksgiving! 🦃🍁
This recipe was AMAZING! Super easy, they came out perfect. I used almond milk and baked the rolls at 350 degrees because I baked them with the turkey. I used 5.5 cups of flour, I let them rise for longer (just over an hour the first rise, and 45 mins the second). Thank you so much for this awesome recipe!
Came out perfectly! Thank you for all the tips; they really helped.
These are great.
Can I retard/make these the night before?
Very delicious! Nice treat for our daughter with fpies!
These are heavenly! I found the dough was too wet and sticky and added more flour. I thought I had botched it but continued anyway. They were amazing! I’m making them again today along with homemade beans.
First time making dinner rolls! These were so easy to make and delicious! Even my husband who is not vegan loved them.
Why won’t anybody just post the recipe at the top of the f****** page!?!?!?
https://www.kitchentreaty.com/why-i-dont-just-get-to-the-recipe/
WHY IS IT SO HARD TO JUST SCOLL DOWN!!!!!!!!
Definitely the best recipe. I tried a few other ones on other popular blogs but they don’t come close
I’m so glad you think so highly of this one! Thank you so much for the review. 🙂
is the sugar essential? I cannot have sugar and am trying to find a vegan bread that does not have sugar. thanks.
Hi Kimberly, no, the sugar is not essential. It adds a bit of flavor and helps the yeast activate. If you leave it out, just give the yeast long enough to activate (get foamy), probably a bit longer than the recipe calls for, and then move on to the next step and you should be good. 🙂
These are wonderful! I’ll be making them for Thanksgiving this year. Thank you so much for the recipe.
Thank you so much for the review. ☺️ Happy you like them and I hope you have a lovely thanksgiving!
These rolls are amazing. I have made them a few times for my niece who is vegan..
No need to try any more vegan dinner roll recipes – this is the ONE! Thanks for this, they came out perfectly and your instructions were very clear and easy to follow 🙂
Hi Laysi, I’m so glad you liked these! Thank you so much for the wonderful review. 🙂
Looking to make these with Ghee instead of vegan butter. I need a dairy free recipe but not vegan. Any thoughts?
Hi, I haven’t tried these with ghee (sorry!) but I suspect they’ll turn out just fine with it. If you try it please report back!
🤦🏼♀️ I just realized Ghee is not diary free but lactose-free. Thank you for your reply
Oh ha I didn’t pick up on that either. 🙂 Happy holidays!
I’ve been trying to perfect vegan dinner rolls for years. This recipe was easy to follow and rolls turned out delicious. Even my non vegan family members loved them!!
I’m so glad this recipe was a success and that everyone loved them! Yay! Thank you so much for the review and happy holidays to you!
Wow! I just turned bang and have been craving bread!!! This is definitely the best vegan bread recipe!!! Soft on the inside and they freeze easily after making them!!! Absolutely amazing! Keep up the great work
Bless you for sharing this recipe!!! And your tips about not adding too much flour and expecting the dough to be on the wet side were so helpful. I stuck to that and it made the most divine dinner rolls I’ve ever had. I halved the recipe and that works wonderfully. I didn’t halve the butter on top though because it’s delicious! I used Miyokos. Just divine rolls though I’m going to make more this week. So delicious I like needed to be alone with them hahaha. Thank you for sharing the recipe I plan on including them for our holiday feasts and even regular dinners from now on!!!
I made these before and they were so good! Could I add pumpkin and sunflower seeds and get the same fluffy results?
Pumpkin seeds would probably be safe but pumpkin changes the whole game! I’ve tried to make pumpkin yeast rolls and frankly have failed. But if you happen to give it a try and have better results, please report back! 🙂
Looks like a winner !!
How could I make the Soft & Fluffy Vegan Dinner Rolls by hand? I don’t have a mixer like that just a hand mixer.
Do you have any tips for making these a day ahead of time? At what point do I stop and refrigerate? I’m a cook and not a baker through and through BUT I’m giving my own rolls a go this year to avoid the nasty ingredients in the store bought options!
I used a dairy free milk made of multiple types of dairy free milks. I also used olive oil because it’s cheaper than dairy free butter. They are soooooooooo good!!!! I’m struggling to stop eating them!
Can you please post the original recipe too? Eggs and all?
I don’t have it, sorry. I had an old piece of paper where she jotted down her recipe and I translated the best I could, then slowly evolved the recipe into this one. And I’m not sure where that piece of paper is 🙁
How do you recommend freezing then thawing to serve these?
These are my go-to Thanksgiving rolls. They please even the pickiest dairy-lovers! I’m wondering if I could freeze the dough shaped into rolls and then defrost the night before and let rise the day of and then bake? Have you ever done this? It would really ease the cooking labor for the holiday.
Hi Lisa, I’m so sorry I didn’t reply earlier! A bit too late for me to answer your question, but I have not tried freezing them. I think it might work though. Did you give it a try? I’d love to know how they turn out! I’m so glad this is a winning recipe for you–it’s one that’s close to my heart. Thank you so much for the review and happy Thanksgiving!
Hi Karen,
I didn’t even realize you’d responded, so I tried it. The turkey cooked an hour and a half faster than I expected (weird!), so the rolls only had 4 hours to thaw and rise. They didn’t rise much, but they got a little fluffier in the bake, so they weren’t lofty like usual, but still delicious and cooked through in 25 minutes. I have half the batch to try again, so I think it could still work. The denser rolls were still very good. I shaped the dough after the first rise and froze on a parchment lined baking sheet before moving to a storage container in the freezer. I’ll let you know about the second batch.